PHP中SERIALIZE和JSON序列化与反序列化的区别
在PHP中,serialize和json两种方式对一个对象或数组进行序列化或反序列化有什么区别呢?
假设一个对象和一个数组:
$web = new stdClass;
$web->site = 'tantengvip';
$web->owner = 'tuntun';
$web->age = 5;
和
$web = array();
$web['site'] = 'tantengvip';
$web['owner'] = 'tuntun';
$web['age'] = 5;
对它们分别用serialize函数和unserialize函数进行序列化和反序列化,看看打印结果分别是什么,如下:
使用serialize方式:
var_dump(serialize($web));
var_dump(unserialize(serialize($web)));
var_dump(json_encode($web));
var_dump(json_decode(json_encode($web)));
结果:
string 'O:8:"stdClass":3:{s:4:"site";s:10:"tantengvip";s:5:"owner";s:6:"tuntun";s:3:"age";i:5;}' (length=87)
object(stdClass)[127]
public 'site' => string 'tantengvip' (length=10)
public 'owner' => string 'tuntun' (length=6)
public 'age' => int 5
string '{"site":"tantengvip","owner":"tuntun","age":5}' (length=46)
object(stdClass)[127]
public 'site' => string 'tantengvip' (length=10)
public 'owner' => string 'tuntun' (length=6)
public 'age' => int 5
使用json方式:
var_dump(serialize($web));
var_dump(unserialize(serialize($web)));
var_dump(json_encode($web));
var_dump(json_decode(json_encode($web),true));
结果
string 'a:3:{s:4:"site";s:10:"tantengvip";s:5:"owner";s:6:"tuntun";s:3:"age";i:5;}' (length=74)
array (size=3)
'site' => string 'tantengvip' (length=10)
'owner' => string 'tuntun' (length=6)
'age' => int 5
string '{"site":"tantengvip","owner":"tuntun","age":5}' (length=46)
array (size=3)
'site' => string 'tantengvip' (length=10)
'owner' => string 'tuntun' (length=6)
'age' => int 5
我们发现,对于前面定义的这样一个对象或数组,用serialize和json进行序列化,反序列化回来的结果和原来是一样的,并没有什么区别,除了序列化的格式不同而已。
那么它们到底有何区别?以下文字总结很好,就不自己加以说明了,可以写代码验证。(链接)
使用json序列化和反序列化
优势:
变量序列化后依然可读
可以给其他系统使用,因为JSON格式是标准的
劣势:
只对UFT-8的数据有效,其他编码可能不能很好工作
只对stdClass类的示例有效
使用serialize方式序列化和反序列化
优势:
允许非UTF-8的变量
支持除了stdClass 示例外的其他实例
劣势:
编码后的文本对人来说是不可读的
无法被其他语言的系统引用
好,写个代码看看:
class Test
{
private $pri = 'pri';
public $class = 'Test';
public function __construct()
{
$this->class = 'Test construct';
$this->pri = 'pri construct';
}
}
$test = new Test();
var_dump(serialize($test));
var_dump(unserialize(serialize($test)));
var_dump(json_encode($test));
var_dump(json_decode(json_encode($test)));
结果:
PHP
string 'O:4:"Test":2:{s:9:"�Test�pri";s:13:"pri construct";s:5:"class";s:14:"Test construct";}' (length=86)
object(Test)[127]
private 'pri' => string 'pri construct' (length=13)
public 'class' => string 'Test construct' (length=14)
string '{"class":"Test construct"}' (length=26)
object(stdClass)[127]
public 'class' => string 'Test construct' (length=14)
我们发现,json序列化和反序列化丢失了类中的私有成员变量,而serialize序列化和反序列化只要是类的变量都可以,但是类的成员方法都无法进行序列化和反序列化。
在一般情况,还是使用json比较好,因为json是跨平台的通用格式,除了json,用xml也比较好。那在什么时候使用serialize方式呢?
在对一个类进行serialize反序列化的时候会默认调用魔术方法__wakeUp(),这样就使得对象能够重新建立起序列化时未能保留的各种状态。例如:数据库连接等。那就是另外一个问题了,这里不做深究了
PHP抽象类和接口是什么意思它们两者有什么区别呢,在此小编来为各位介绍一篇关于PHP抽象类和接口的区别吧,具体的细节如下所示,希望文章能够帮助到各位朋友。抽象类(abstract class)和接口(interface)是面向对象很重要的概念,他们很相似,都是定义要实现的方法,但又有不同的使用场景,PHP的抽象类和接口有什么区别,看下面的示例。
接口(Interface)—— 定义行为
抽象类(Abstract Class) —— 实现行为
具体类(class)——执行行为
一.接口
接口定义了某种函数的规范,声明了所需的函数和常量,但是不能指定怎么实现。接口像是对具体类中方法的规范。
接口定义了发生某一行为需要的方法、方法名。然后允许具体的类来实现这些方法。。
注意:接口类不能定义类成员。定义的方法必须在实现的类中出现。
interface 接口名
{
function 方法1( );
function 方法2( );
}
//实现接口
class 类名 implements 接口名
{
方法1( );
方法2( );
}
二.抽象类
抽象类是实例化的类,只能作为被其他类基层的基类。例如,可以写一个关于read的抽象类,然后电子阅读,纸质阅读来继承read抽象类。
abstract class 类名
{
各种方法
}
抽象类可以确保一致性,因为任何派生类都必须实现从该抽象类继承所有抽象方法,如果没有实现,那将产生错误。
应该用抽象类?还是 接口?
这是一个问题
** 如果要建一个类模型,这个模型将由一些紧密相关的对象采用,使用抽象类。如果模型将由不太相关的对象采用,用接口。
** 如果一个具体class将从多个来源继承行为,用接口。php类可以继承多个接口,但是不能继承多个抽象类。
** 如果所有的类都要共享一个公共的行为实现,用抽象类,并在其中实现该行为。。先用子类继承一个抽象类,继承后的子类能够实现原先的行为。。
摘: _______
事物的出现,总是有它出现的理由(需求)!
但是,事物的生存,需要有适应性(灵活)!
比如:长颈鹿,脖子长,这是个抽象的概念;
能吃草(是非肉食性动物的特征,接口)。
所以,当需要描述长颈鹿的时候,我们就可以用接口(非肉食性动物)和抽象(脖子长)的方法来定义它,
然后,具体是什么种类/或者颜色的长颈鹿,怎么个吃草法,这就是具体类了
PHP接口类
首先看接口,定一个接口类,interface class:
<?php
namespace frontend\models;
interface TestInterface
{
public function cloud();
public function sky();
public static function color($color);
}
在PHP中,接口只能定义方法(或静态方法),但是不能实现具体的方法。在PhpStorm中如果写具体的方法会提示错误。接口比较严格的定义需要实现什么方法,只写要实现的方法就行了,不需要具体实现,或定义成员变量。
使用接口:
<?php
namespace frontend\models;
class Test implements TestInterface
{
public function cloud()
{
echo 'Cloud....';
}
public function sky()
{
}
public static function color($color){
}
}
继承接口类,必须实现接口定义的每个方法,否则也会报错。这就是PHP的接口,严格定义实现哪些方法,并且必须在子类中都实现。
PHP抽象类
我们定义一个抽象类:
abstract class Testabstract
{
public $abstract = 'abstract';
abstract function hehe();
public function hehe2()
{
echo 'hehe2';
}
}
这里有两个方法,一个是用abstract修饰的,这样写表示该方法是子类必须实现的,而抽象类中只能定义不能具体实现。一个方法是普通的成员方法,而且有具体实现,子类也可以重写。
class ab extends Testabstract
{
public function hehe()
{
echo 'hehe';
}
}
子类继承抽象类,只需实现抽象类中定义的抽象方法。抽象类可以定义成员变量,而接口不行。
phpqrcode是一个php生成二维码的类库,我们可以利用他轻松生成二维码,本文我们来看看用yii如何整合phpqrcode生成二维码的。以前我们讲过一些关于用phpqrcode生成二维码的文章,下面我们先列出来
php利用PHP QR Code生成二维码(带logo)
PHP生成二维码(使用PHP QR Code二维码生成类库)
利用phpqrcode生成二维码实例代码
超简单PHP生成二维码实例
下面我们来讲讲yii整合phpqrcode生成二维码的实例。
1,先到官网下载包 http://phpqrcode.sourceforge.net/
下载官网提供的类库后,只需要使用phpqrcode.php就可以生成二维码了,当然您的PHP环境必须开启支持GD2。
phpqrcode.php提供了一个关键的png()方法,其中
参数$text表示生成二位的的信息文本;
参数$outfile表示是否输出二维码图片 文件,默认否;
参数$level表示容错率,也就是有被覆盖的区域还能识别,分别是 L(QR_ECLEVEL_L,7%),M(QR_ECLEVEL_M,15%),Q(QR_ECLEVEL_Q,25%),H(QR_ECLEVEL_H,30%);
参数$size表示生成图片大小,默认是3;参数$margin表示二维码周围边框空白区域间距值;
参数$saveandprint表示是否保存二维码并显示。
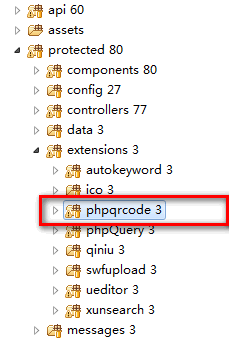
2,下载后把解压后的phpqrcode文件夹放到extensions文件夹下,如下图:
3,引入类 phpqrcode
Yii::$enableIncludePath = false;
Yii::import ('application.extensions.phpqrcode.phpqrcode', 1 );
下面是完整的生成二维码的方法
public function actionQrcode(){
        $this->breadcrumbs=array_merge($this->breadcrumbs,array(
                '生成二维码'
        ));
        $qrcode_path='';
        $file_tmp_name='';
        $errors=array();
        if(!empty($_POST)){
            $content = trim($_POST['content']); //二维码内容
            $contentSize=$this->getStringLength($content);
            if($contentSize>290){
                $errors[]='字数过长,不能多于150个字符!';
            }
            Yii::$enableIncludePath = false;
            Yii::import ('application.extensions.phpqrcode.phpqrcode', 1 );
            if(isset($_FILES['upimage']['tmp_name']) && $_FILES['upimage']['tmp_name'] && is_uploaded_file($_FILES['upimage']['tmp_name'])){
                if($_FILES['upimage']['size']>512000){
                    $errors[]="你上传的文件过大,最大不能超过500K。";
                }
                $file_tmp_name=$_FILES['upimage']['tmp_name'];
                $fileext = array("image/pjpeg","image/jpeg","image/gif","image/x-png","image/png");
                if(!in_array($_FILES['upimage']['type'],$fileext)){
                    $errors[]="你上传的文件格式不正确,仅支持 png, jpg, gif格式。";
                }
            }
            $tpgs=$_POST['tpgs'];//图片格式
            $bas_path=dirname ( Yii::app ()->BasePath );
            $qrcode_bas_path=$bas_path.'/upload/qrcode/';
            if(!is_dir($qrcode_bas_path)){
                mkdir($qrcode_bas_path, 0777, true);
            }
            $uniqid_rand=date("Ymdhis").uniqid(). rand(1,1000);
            $qrcode_path=$qrcode_bas_path.$uniqid_rand. "_1.".$tpgs;
            $qrcode_path_new=$qrcode_bas_path.$uniqid_rand."_2.".$tpgs;
            if(Helper::getOS()=='Linux'){

                $mv = move_uploaded_file($file_tmp_name, $qrcode_path);
            }else{
                //解决windows下中文文件名乱码的问题
                $save_path = Helper::safeEncoding($qrcode_path,'GB2312');
                if(!$save_path){
                    $errors[]='上传失败,请重试!';
                }
                $mv = move_uploaded_file($file_tmp_name, $qrcode_path);
            }
            if(empty($errors)){
                $errorCorrectionLevel = $_POST['errorCorrectionLevel'];//容错级别
                $matrixPointSize = $_POST['matrixPointSize'];//生成图片大小
                $matrixMarginSize = $_POST['matrixMarginSize'];//边距大小
                //生成二维码图片
                QRcode::png($content,$qrcode_path_new, $errorCorrectionLevel, $matrixPointSize, $matrixMarginSize);
                $QR = $qrcode_path_new;//已经生成的原始二维码图
                $logo = $qrcode_path;//准备好的logo图片
                if (file_exists($logo)) {
                    $QR = imagecreatefromstring(file_get_contents($QR));
                    $logo = imagecreatefromstring(file_get_contents($logo));
                    $QR_width = imagesx($QR);//二维码图片宽度
                    $QR_height = imagesy($QR);//二维码图片高度
                    $logo_width = imagesx($logo);//logo图片宽度
                    $logo_height = imagesy($logo);//logo图片高度
                    $logo_qr_width = $QR_width / 5;
                    $scale = $logo_width/$logo_qr_width;
                    $logo_qr_height = $logo_height/$scale;
                    $from_width = ($QR_width - $logo_qr_width) / 2;
                    //重新组合图片并调整大小
                    imagecopyresampled($QR, $logo, $from_width, $from_width, 0, 0, $logo_qr_width,
                    $logo_qr_height, $logo_width, $logo_height);
                    //输出图片
//                  header("Content-type: image/png");
                    imagepng($QR,$qrcode_path);
                    imagedestroy($QR);
                }else{
                    $qrcode_path=$qrcode_path_new;
                }
                $qrcode_path=str_replace($bas_path,'', $qrcode_path);
            }else{
                $qrcode_path='';
            }
        }
        $data=array('data'=>array('errors'=>$errors,'qrcode_path'=>$qrcode_path));
        $this->render ( 'qrcode',$data);
    }
前台的上传界面:
<?php
$vars = get_defined_vars ();
$data = $vars ['data'];
$content=Yii::app ()->request->hostInfo;
$matrixPointSize=6;
$matrixMarginSize=2;
$errorCorrectionLevel='M';
$tpgs='gif';
if(!empty($_POST)){
    $content=$_POST['content'];
    $matrixPointSize=$_POST['matrixPointSize'];
    $matrixMarginSize=$_POST['matrixMarginSize'];
    $errorCorrectionLevel=$_POST['errorCorrectionLevel'];
    $tpgs=$_POST['tpgs'];
}

$arrayCorrectionLevel=array('L'=>'L - Low (7%)','M'=>'M - Medium (15%)','Q'=>'Q - Quartile (25%)','H'=>'H - High (30%)');
$arrayTpgs=array('gif'=>'gif格式','png'=>'png格式','jpg格式');
?>
<div class="col-md-12">
    <div class="form-horizontal panel panel-default margin-t-10 b-img">
        <div class="panel-heading">
            <div class="pull-left">
                <span class="g-bg glyphicon glyphicon-wrench margin-r-2"
                    aria-hidden="true"></span>在线生成二维码
            </div>
            <div class="clearfix"></div>
        </div>
<?php
$form = $this->beginWidget ( 'CActiveForm', array (
        'id' => 'qrcode-form',
        'htmlOptions' => array (
                'id' => 'view_table',
                'class' => 'add-form padding-10',
                'enctype' => 'multipart/form-data'
        ),
        'enableAjaxValidation' => false
) );
?>
    <div class="form-group">
            <label class="col-lg-2 control-label">尺寸大小</label>
            <div class="col-lg-3">
                <select class="form-control" id="matrixPointSize"
                    name="matrixPointSize">
                    <?php for ($i=1;$i<21;$i++):?>
                        <option value="<?php echo $i;?>" <?php echo $i==$matrixPointSize?'selected':'';?>><?php echo $i;?></option>
                    <?php endfor;?>
                    </select>
            </div>
        </div>
        <div class="form-group">
            <label class="col-lg-2 control-label">边距大小</label>
            <div class="col-lg-3">
                <select class="form-control" id="matrixMarginSize"
                    name="matrixMarginSize">
                    <?php for ($i=0;$i<21;$i++):?>
                        <option value="<?php echo $i;?>" <?php echo $i==$matrixMarginSize?'selected':'';?>><?php echo $i;?></option>
                    <?php endfor;?>
                </select>
            </div>
        </div>
        <div class="form-group">
            <label class="col-lg-2 control-label">容错级别</label>
            <div class="col-lg-3">
            <?php echo CHtml::dropDownList('errorCorrectionLevel',$errorCorrectionLevel, $arrayCorrectionLevel,array('class'=>'form-control'));?>
            </div>
        </div>
        <div class="form-group">
            <label class="col-lg-2 control-label">保存格式</label>
            <div class="col-lg-3">
            <?php echo CHtml::dropDownList('tpgs',$tpgs, $arrayTpgs,array('class'=>'form-control'));?>
            </div>
        </div>
        <div class="form-group">
            <label class="col-lg-2 control-label">二维码内容</label>
            <div class="col-lg-5">
                <?php echo CHtml::textField('content',$content,array('class'=>'form-control','maxlength'=>150));?>
            </div>
        </div>
        <div class="form-group">
            <label class="col-lg-2 control-label">二维码logo图片</label>
            <div class="col-lg-5">
                <div class="col-md-6">
                        <input id="upimage" type="file" name="upimage" class="hidden">
                        <input id="tmp_file" class="form-control" type="text" value="gif,png,jpg">
                    </div>
                <div class="col-md-6"><a class="btn btn-default" onclick="$('input[id=upimage]').click();">选择文件</a></div>
            </div>
        </div>
        <div class="list_back">
            <input type="submit" value="生成二维码" class="btn btn-success">
        </div>
    </div>
<?php $this->endWidget(); ?>
    <div class="panel panel-default margin-t-10 b-img">
        <div class="panel-heading">
            <span class="g-bg glyphicon glyphicon-wrench margin-r-2" aria-hidden="true"></span>二维码
        </div>
        <div class="panel-body">
        <?php if(empty($_POST)):?>
        <?php echo CHtml::image('/static/tool/qrcode/qrcode.gif','二维码');?>
        <?php endif;?>
        <?php if(!empty($data['errors'])):?>
            <label class="col-lg-2 text-right">生成失败</label>
            <div class="col-lg-5">
            <?php foreach ($data['errors'] as $e):?>
            <?php echo $e;?><br>
            <?php endforeach;?>
            </div>
        <?php endif;?>
        <?php if(!empty($data['qrcode_path'])):?>
            <?php echo CHtml::image($data['qrcode_path'],'二维码');?>
            <a class="btn btn-success color-f" href="<?php echo $data['qrcode_path'];?>" target="_blank"><span aria-hidden="true" class="glyphicon glyphicon-download-alt margin-r-2"></span>右键另存为二维码</a>
        <?php endif;?>
        </div>
    </div>
<?php $this->renderPartial('/component/duoshuo_common');?>
</div>
如图:

php语言本身没有将多维数组转为一维数组的函数,但是我们可以自己写一个php函数来实现将多维转一维的功能。
运用了递归,简单粗暴,整个函数体9行代码就实现了该功能,php源码如下:
$multi = array(
array(
array(
'wo',
'shi'
),
'php'
),
'cheng',
array(
array(
'xu',
'yuan',
)
),
'!'
);
$multi = arrToOne($multi);
print_r($multi);
function arrToOne($multi) {
$arr = array();
foreach ($multi as $key => $val) {
if( is_array($val) ) {
$arr = array_merge($arr, arrToOne($val));
} else {
$arr[] = $val;
}
}
return $arr;
}
执行后的效果:
Array
(
[0] => wo
[1] => shi
[2] => php
[3] => cheng
[4] => xu
[5] => yuan
[6] => !
)
PHPExcel是一个强大的excel导出/导入插件,它甚至还可以导出pdf等,是个非常好用的php插件,php学习必不可少。那么如何使用它呢,下面是PHPExcel入门范例:
php源码参考:
<?php
require_once("PHPExcel/PHPExcel.php");
$excel = new PHPExcel(); //实例化PHPExcel类
//设置作者(非必要)
$excel->getProperties()->setCreator("Reson");
//以下是要导出的数据
$datas = array(
array(
0 => 'UID',
1 => '用户名',
2 => '性别'
),
array(
0 => '1',
1 => 'reson',
2 => '男'
),
array(
0 => '2',
1 => 'anyse',
2 => '女'
)
);
//开始导出。注意$i要从1开始,不能从0开始,原因如下:'A'.$i,当i=1即为A1(第一行,第一个格子)
$i = 1;
foreach($datas as $key => $val){
$excel->getActiveSheet()->setCellValue('A'.$i, $val['0']);
$excel->getActiveSheet()->setCellValue('B'.$i, $val['1']);
$excel->getActiveSheet()->setCellValue('C'.$i, $val['2']);
$i++;
}
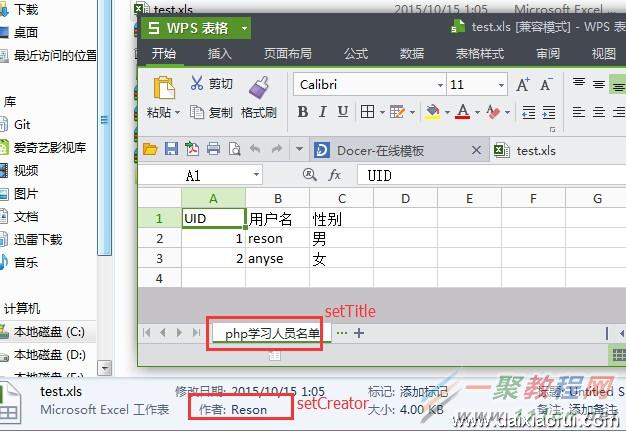
$excel->getActiveSheet()->setTitle('php学习人员名单'); //含义见下图
$fileName = 'test';
header("Pragma: public");
header("Expires: 0");
header("Cache-Control:must-revalidate, post-check=0, pre-check=0");
header("Content-Type:application/force-download");
header("Content-Type:application/vnd.ms-execl");
header("Content-Type:application/octet-stream");
header("Content-Type:application/download");;
header('Content-Disposition: attachment;filename="'.$fileName.'.xls"');
header("Content-Transfer-Encoding:binary");
$objWriter = PHPExcel_IOFactory::createWriter($excel, 'Excel5');
$objWriter->save('php://output');
?>
出后就是这个样子了,是不是非常好用呢
相关文章
Jackson反序列化@JsonFormat 不生效的解决方案
这篇文章主要介绍了Jackson反序列化@JsonFormat 不生效的解决方案,具有很好的参考价值,希望对大家有所帮助。如有错误或未考虑完全的地方,望不吝赐教...2021-08-10- 这篇文章主要介绍了postgresql重置序列起始值,具有很好的参考价值,希望对大家有所帮助。一起跟随小编过来看看吧...2021-01-04
- 这篇文章主要介绍了Postgresql数据库之创建和修改序列的操作,具有很好的参考价值,希望对大家有所帮助。一起跟随小编过来看看吧...2021-02-04
- 这篇文章主要介绍了解决Golang json序列化字符串时多了\的情况,具有很好的参考价值,希望对大家有所帮助。一起跟随小编过来看看吧...2020-12-24
- 序列化是一种对象持久化的手段,普遍应用在网络传输、RMI等场景中,这篇文章主要给大家总结介绍了关于java序列化与反序列化的使用方法,文中通过示例代码介绍的非常详细,需要的朋友可以参考下...2021-07-29
- 下面小编就为大家带来一篇protobuf对象二进制序列化存储(详解)。小编觉得挺不错的,现在就分享给大家,也给大家做个参考。一起跟随小编过来看看吧...2020-06-25
- 怎么用perl程序,随机生成一条序列,使ACGT四种碱基的含量分别为0.3,0.3,0.2,0.2!...2020-06-29
jQuery Form 表单提交插件之formSerialize,fieldSerialize,fieldValue,resetForm,clearForm,clearFields的应用
这篇文章主要介绍了jQuery Form 表单提交插件之formSerialize,fieldSerialize,fieldValue,resetForm,clearForm,clearFields的应用的相关资料,需要的朋友可以参考下...2016-01-25- 经常看到一些配置文件里面存放的是一些类似带有格式的变量名称和值,其实就是一个序列化的过程,在需要用到这些数据库的时候会进行一个反序列化过程,就是将这个字符串再还原成他原来的数据结构。下面说说php 如何进行数据...2015-10-30
- 这篇文章主要介绍了C#实现的json序列化和反序列化代码实例,本文讲解了两种实现方法,并直接给出代码示例,需要的朋友可以参考下...2020-06-25
- 这篇文章主要介绍了C#实现的序列化通用类,实例分析了C#序列化与反序列化操作相关技巧,需要的朋友可以参考下...2020-06-25
- 下面小编就为大家带来一篇jquery.serialize() 函数语法及简单实例。小编觉得挺不错的,现在就分享给大家,也给大家做个参考。一起跟随小编过来看看吧...2016-07-25
- 这篇文章主要介绍了Jackson 反序列化时实现大小写不敏感设置方式,具有很好的参考价值,希望对大家有所帮助。如有错误或未考虑完全的地方,望不吝赐教...2021-06-29
- 在这篇文章中,我们将会学到如何使用C#,来序列化对象成为Json格式的数据,以及如何反序列化Json数据到对象。...2020-06-25
- 这篇文章主要介绍了C#中Serializable序列化,以实例形式详细讲述了系列化的技术及各种序列化方法,非常具有实用价值,需要的朋友可以参考下...2020-06-25
- 下面小编就为大家带来一篇用序列化实现List<T> 实例的深复制(推荐)。小编觉得挺不错的,现在就分享给大家,也给大家做个参考。一起跟随小编过来看看吧...2020-06-25
- 这篇文章主要介绍了C#实现复杂XML的序列化与反序列化的方法,是非常实用的一个技巧,需要的朋友可以参考下...2020-06-25
- 这篇文章主要介绍了javascript中from 表单序列化提交的实现方法,代码简单易懂,非常不错,需要的朋友参考下吧...2017-01-23
- 这篇文章主要介绍了解决postgresql 序列跳值的问题,具有很好的参考价值,希望对大家有所帮助。一起跟随小编过来看看吧...2021-02-04
深入分析XmlSerializer对象的Xml序列化与反序列化的示例详解
本篇文章是对XmlSerializer 对象的Xml序列化与反序列化的应用进行了详细的分析介绍,需要的朋友参考下...2021-09-22