利用Matlab复刻举牌加油小人生成器
突然发现cla函数也可以应用到app designer控件上,因而对部分内容做出更改。
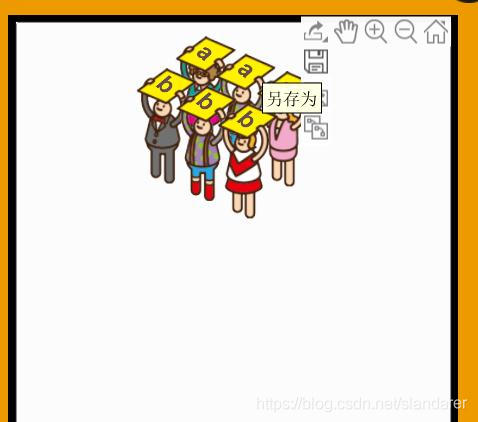
手痒,用matlab app designer复刻了一款举牌加油小人生成器,效果如下:
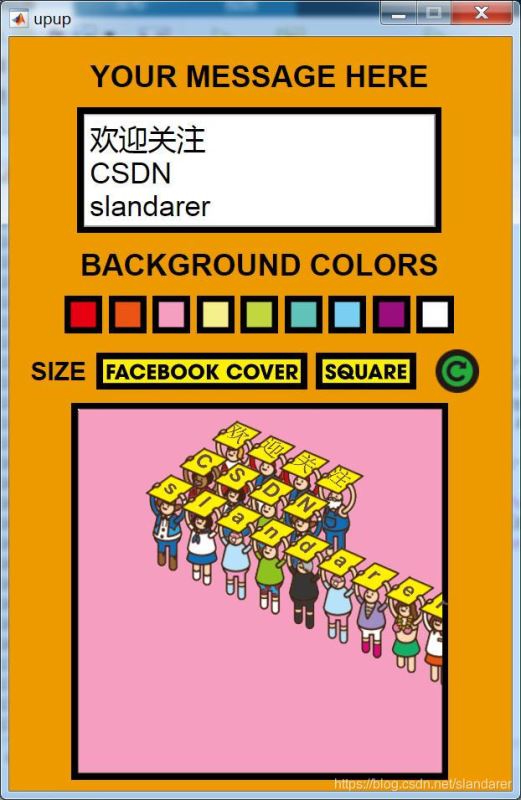
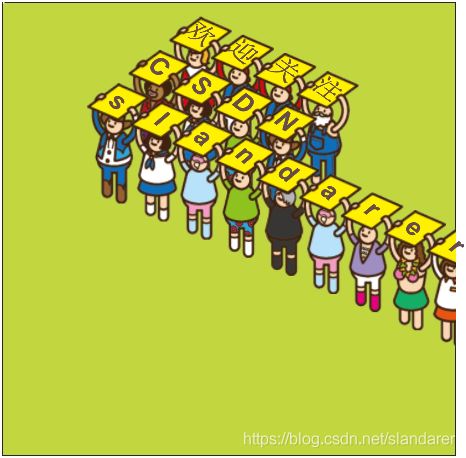
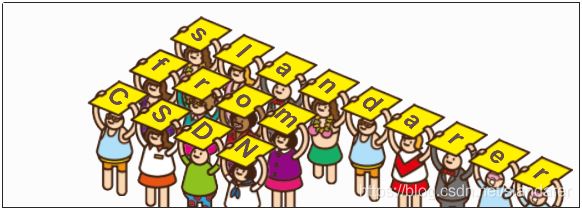
该程序可以生成正方形和长方形举牌小人,并且可以自己设置背景颜色(点击那些有颜色的小框框),点击绿色旋转按钮可以刷新生成的图片。
目前需要存图还是需要通过uiaxes自带的toolbar(下图右上角所示):
使用该程序需要小人的素材包,我已经将素材整理为materials.mat文件,网盘下载链接如下:
链接:https://pan.baidu.com/s/1ISloOsq8bIVDjm8TzRPlKw
提取码:1234
使用时需要把materials.mat和m文件放在同一文件夹
完整代码
function upup
global textMsg bkgColor colorList axesType
global textArea
textMsg=[];
axesType=2;
bkgColor=[1,1,1];
colorList=[0.9000         0    0.0700
    0.9200    0.3300    0.0800
    0.9600    0.6200    0.7500
    0.9600    0.9400    0.5500
    0.7600    0.8400    0.2500
    0.3800    0.7600    0.7300
    0.4700    0.8100    0.9400
    0.6000    0.0500    0.4900
    1         1         1     ];


%load pic and create pic ==================================================
materials=load('materials.mat');
if ~exist('materials','dir')
   mkdir('materials');
end
for i=1:size(colorList,1)
    Rc=zeros(60,60);Rc(11:50,11:50)=255.*colorList(i,1);
    Gc=zeros(60,60);Gc(11:50,11:50)=255.*colorList(i,2);
    Bc=zeros(60,60);Bc(11:50,11:50)=255.*colorList(i,3);
    cPic(:,:,1)=Rc;cPic(:,:,2)=Gc;cPic(:,:,3)=Bc;
    imwrite(uint8(cPic),['materials\bkg',num2str(i),'.png'])
end
imwrite(materials.imgSet.cover,'materials\cover.jpg')
imwrite(materials.imgSet.square,'materials\square.jpg')
imwrite(materials.imgSet.refresh.CData,'materials\refresh.png','Alpha',materials.imgSet.refresh.AData)


%==========================================================================
upFig=uifigure('units','pixels',...
    'position',[320 50 400 600],...
    'Numbertitle','off',...
    'menubar','none',...
    'resize','off',...
    'name','upup',...
    'color',[0.93 0.6 0]);

%==========================================================================
textAreaLabel=uilabel(upFig);
textAreaLabel.Position=[55 445 290 100];
textAreaLabel.Text='';
textAreaLabel.BackgroundColor=[0,0,0];
textArea=uitextarea(upFig,'ValueChangedFcn',@changeText);
textArea.Position=[60 450 280 90];
textArea.FontSize=23;

%text label hdl part=======================================================
textLabel_1=uilabel(upFig);
textLabel_1.Position=[52 517 296 106];
textLabel_1.Text='YOUR MESSAGE HERE';
textLabel_1.FontSize=24;
textLabel_1.FontWeight='bold';
textLabel_1.HorizontalAlignment='center';

textLabel_2=uilabel(upFig);
textLabel_2.Position=[52 367 296 106];
textLabel_2.Text='BACKGROUND COLORS';
textLabel_2.FontSize=24;
textLabel_2.FontWeight='bold';
textLabel_2.HorizontalAlignment='center';

textLabel_3=uilabel(upFig);
textLabel_3.Position=[10 310 60 50];
textLabel_3.Text='SIZE';
textLabel_3.FontSize=20;
textLabel_3.FontWeight='bold';
textLabel_3.HorizontalAlignment='center';


%bkg color hdl part========================================================
for i=1:size(colorList,1)
    CL(i)=uiimage(upFig);
    CL(i).Position=[10+i*35,365,30,30];
    CL(i).UserData=i;
    CL(i).ImageSource=['materials\bkg',num2str(i),'.png'];
end
set(CL,'ImageClickedFcn',@bkgChange)


%reset Size hdl part=======================================================
sizeBtn(1)=uiimage(upFig);
sizeBtn(1).Position=[70 320 168 30];
sizeBtn(1).UserData=1;
sizeBtn(1).ImageSource='materials\cover.jpg';

sizeBtn(2)=uiimage(upFig);
sizeBtn(2).Position=[245 320 80 30];
sizeBtn(2).UserData=2;
sizeBtn(2).ImageSource='materials\square.jpg';
set(sizeBtn,'ImageClickedFcn',@sizeChange)


%==========================================================================
refreshBtn=uiimage(upFig);
refreshBtn.Position=[340 317.5 35 35];
refreshBtn.ImageSource='materials\refresh.png';
set(refreshBtn,'ImageClickedFcn',@changeText)

%==========================================================================
upAx=uiaxes('Units','pixels',...
      'parent',upFig,...
      'Position',[50 10 300 300],...
      'Color',[0.99 0.99 0.99],...
      'Box','on', ...
      'XTick',[],...
      'YTick',[],...
      'XLimMode','manual',...
      'YLimMode','manual',...
      'XLim',[0 300],...
      'YLim',[0 300], ...
      'BackgroundColor',[0,0,0],...
      'YDir','reverse');
hold(upAx,'on')


%==========================================================================

    function bkgChange(~,event)
        objNum=event.Source.UserData;
        upAx.Color=colorList(objNum,:);
    end

    function sizeChange(~,event)
        axesType=event.Source.UserData;
        switch axesType
            case 1
                upAx.Position=[10 120 380 141];
                upAx.XLim=[0 380];
                upAx.YLim=[0 141];
            case 2
                upAx.Position=[50 10 300 300];
                upAx.XLim=[0 300];
                upAx.YLim=[0 300];
        end
    end

    function changeText(~,~)
        cla(upAx)
%         hold(upAx,'off')
%         image(upAx,[-1,0],[-1,0],ones(1,1,3),'visible','off');
%         hold(upAx,'on')
        textMsg=textArea.Value;
        for ii=1:length(textMsg)
            tempStr=textMsg{ii};
            for jj=1:length(tempStr)
                if tempStr(jj)~=' '
                    roleType=randi(24);
                    image(upAx,[0,103*0.4]+110+28*(jj-1)-27*(ii-1),...
                        [0,198*0.4]+10+12*(jj-1)+22*(ii-1),...
                        materials.imgSet.CData{roleType},...
                        'AlphaData',materials.imgSet.AData{roleType},...
                        'Interpolation','bilinear')
                    text(upAx,21+110+28*(jj-1)-27*(ii-1),...
                        10+10+12*(jj-1)+22*(ii-1),...
                        tempStr(jj),'rotation',-38,'FontSize',16,...
                        'FontWeight','bold','Color',[0.4,0.3,0.3],...
                        'FontAngle','italic','HorizontalAlignment','center');
                end
            end
        end
    end
end
另:完整素材包+mat文件+m文件可以在下面下载
百度网盘链接:https://pan.baidu.com/s/1F6Z3_-91_OKtV2zjQUg47Q
注:代码和素材仅作学习用途,勿做他用
另
若matlab是版本为R2016a以后,R2019a之前,会因为uiimage未被推出而无法正常使用,可以尝试以下代码,该代码依旧需要materials.mat和m文件在同一文件夹:
function upupUiBtn
global textMsg bkgColor colorList axesType
global textArea
textMsg=[];
axesType=2;
bkgColor=[1,1,1];
colorList=[0.9000         0    0.0700
    0.9200    0.3300    0.0800
    0.9600    0.6200    0.7500
    0.9600    0.9400    0.5500
    0.7600    0.8400    0.2500
    0.3800    0.7600    0.7300
    0.4700    0.8100    0.9400
    0.6000    0.0500    0.4900
    1         1         1     ];
%load pic and create pic ==================================================
materials=load('materials.mat');
if ~exist('materials','dir')
   mkdir('materials');
end
for i=1:size(colorList,1)
    Rc=zeros(60,60);Rc(11:50,11:50)=255.*colorList(i,1);
    Gc=zeros(60,60);Gc(11:50,11:50)=255.*colorList(i,2);
    Bc=zeros(60,60);Bc(11:50,11:50)=255.*colorList(i,3);
    cPic(:,:,1)=Rc;cPic(:,:,2)=Gc;cPic(:,:,3)=Bc;
    imwrite(uint8(cPic),['materials\bkg',num2str(i),'.png'])
end
imwrite(materials.imgSet.cover,'materials\cover.jpg')
imwrite(materials.imgSet.square,'materials\square.jpg')
imwrite(materials.imgSet.refresh.CData,'materials\refresh.png','Alpha',materials.imgSet.refresh.AData)

%==========================================================================
upFig=uifigure('units','pixels',...
    'position',[320 50 400 600],...
    'Numbertitle','off',...
    'menubar','none',...
    'resize','off',...
    'name','upup',...
    'color',[0.93 0.6 0]);

%==========================================================================
textAreaLabel=uilabel(upFig);
textAreaLabel.Position=[55 445 290 100];
textAreaLabel.Text='';
textAreaLabel.BackgroundColor=[0,0,0];
textArea=uitextarea(upFig,'ValueChangedFcn',@changeText);
textArea.Position=[60 450 280 90];
textArea.FontSize=23;

%text label hdl part=======================================================
textLabel_1=uilabel(upFig);
textLabel_1.Position=[52 517 296 106];
textLabel_1.Text='YOUR MESSAGE HERE';
textLabel_1.FontSize=24;
textLabel_1.FontWeight='bold';
textLabel_1.HorizontalAlignment='center';

textLabel_2=uilabel(upFig);
textLabel_2.Position=[52 367 296 106];
textLabel_2.Text='BACKGROUND COLORS';
textLabel_2.FontSize=24;
textLabel_2.FontWeight='bold';
textLabel_2.HorizontalAlignment='center';

textLabel_3=uilabel(upFig);
textLabel_3.Position=[10 310 60 50];
textLabel_3.Text='SIZE';
textLabel_3.FontSize=20;
textLabel_3.FontWeight='bold';
textLabel_3.HorizontalAlignment='center';

%bkg color hdl part========================================================
for i=1:size(colorList,1)
    CL(i)=uibutton(upFig);
    CL(i).Position=[10+i*35,365,30,30];
    CL(i).BackgroundColor=[0 0 0];
    CL(i).Text='';
    CL(i).UserData=i;
    CL(i).Icon=['materials\bkg',num2str(i),'.png'];
end
set(CL,'ButtonPushedFcn',@bkgChange)

%reset Size hdl part=======================================================
sizeBtn(1)=uibutton(upFig);
sizeBtn(1).Position=[80 320 145 32];
sizeBtn(1).UserData=1;
sizeBtn(1).Text='';
sizeBtn(1).BackgroundColor=[0 0 0];
sizeBtn(1).Icon='materials\cover.jpg';

sizeBtn(2)=uibutton(upFig);
sizeBtn(2).Position=[235 320 78 32];
sizeBtn(2).UserData=2;
sizeBtn(2).Text='';
sizeBtn(2).BackgroundColor=[0 0 0];
sizeBtn(2).Icon='materials\square.jpg';
set(sizeBtn,'ButtonPushedFcn',@sizeChange)


refreshBtn=uibutton(upFig);
refreshBtn.Position=[330 318 35 35];
refreshBtn.Text='';
refreshBtn.BackgroundColor=[0.93 0.6 0];
refreshBtn.Icon='materials\refresh.png';
set(refreshBtn,'ButtonPushedFcn',@changeText)
%==========================================================================
upAx=uiaxes('Units','pixels',...
      'parent',upFig,...
      'Position',[50 10 300 300],...
      'Color',[0.99 0.99 0.99],...
      'Box','on', ...
      'XTick',[],...
      'YTick',[],...
      'XLimMode','manual',...
      'YLimMode','manual',...
      'XLim',[0 300],...
      'YLim',[0 300], ...
      'BackgroundColor',[0,0,0],...
      'YDir','reverse');
hold(upAx,'on')


%==========================================================================

    function bkgChange(~,event)
        objNum=event.Source.UserData;
        upAx.Color=colorList(objNum,:);
    end

    function sizeChange(~,event)
        axesType=event.Source.UserData;
        switch axesType
            case 1
                upAx.Position=[10 120 380 141];
                upAx.XLim=[0 380];
                upAx.YLim=[0 141];
            case 2
                upAx.Position=[50 10 300 300];
                upAx.XLim=[0 300];
                upAx.YLim=[0 300];
        end
    end

    function changeText(~,~)
        cla(upAx)
%         hold(upAx,'off')
%         image(upAx,[-1,0],[-1,0],ones(1,1,3),'visible','off');
%         hold(upAx,'on')
        textMsg=textArea.Value;
        for ii=1:length(textMsg)
            tempStr=textMsg{ii};
            for jj=1:length(tempStr)
                if tempStr(jj)~=' '
                    roleType=randi(24);
                    image(upAx,[0,103*0.4]+110+28*(jj-1)-27*(ii-1),...
                        [0,198*0.4]+10+12*(jj-1)+22*(ii-1),...
                        materials.imgSet.CData{roleType},...
                        'AlphaData',materials.imgSet.AData{roleType},...
                        'Interpolation','bilinear')
                    text(upAx,21+110+28*(jj-1)-27*(ii-1),...
                        10+10+12*(jj-1)+22*(ii-1),...
                        tempStr(jj),'rotation',-38,'FontSize',16,...
                        'FontWeight','bold','Color',[0.4,0.3,0.3],...
                        'FontAngle','italic','HorizontalAlignment','center');
                end
            end
        end
    end
end
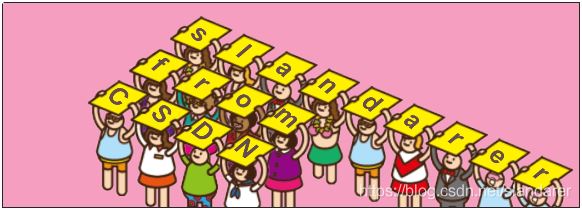
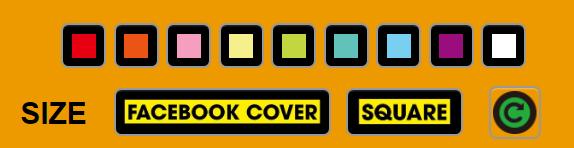
非uiimage版按钮长这样:
以上就是利用Matlab复刻举牌加油小人生成器的详细内容,更多关于Matlab举牌加油小人生成器的资料请关注猪先飞其它相关文章!
原文出处:https://blog.csdn.net/slandarer/article/details/118161500
相关文章
pytorch::Dataloader中的迭代器和生成器应用详解
这篇文章主要介绍了pytorch::Dataloader中的迭代器和生成器应用详解,文中通过示例代码介绍的非常详细,对大家的学习或者工作具有一定的参考学习价值,需要的朋友们下面随着小编来一起学习学习吧...2020-04-30- 这篇文章主要介绍了matlab中 sort 函数用法 的相关资料,需要的朋友可以参考下...2016-03-22
- 这篇文章主要介绍了如何用Matlab和Python读取Netcdf文件,帮助大家更好的理解和学习使用python,感兴趣的朋友可以了解下...2021-02-20
Javascript生成器(Generator)的介绍与使用
这篇文章主要给大家介绍了关于Javascript生成器(Generator)的相关资料,文中通过示例代码介绍的非常详细,对大家的学习或者工作具有一定的参考学习价值,需要的朋友们下面随着小编来一起学习学习吧...2021-01-31- 这篇文章主要介绍了Matlab使用fft画出信号频谱图的方法,本文通过实例图文相结合给大家介绍的非常详细,对大家的学习或工作具有一定的参考借鉴价值,需要的朋友可以参考下...2021-05-19
将pycharm配置为matlab或者spyder的用法说明
这篇文章主要介绍了将pycharm配置为matlab或者spyder的用法说明,具有很好的参考价值,希望对大家有所帮助。一起跟随小编过来看看吧...2020-06-09- Vbs脚本病毒生成器 V1.0 版 简 介: 国产的新编的vbs脚本病毒生成器1.0版, 本程序通过采集用户的各项输入、选择,产生符合需要的vbs脚本病毒,属于傻瓜式的vbs病毒制造程...2020-06-30
- 这篇文章主要介绍了MATLAB 求取离散点的曲率最大值操作,具有很好的参考价值,希望对大家有所帮助。一起跟随小编过来看看吧...2021-04-16
- 这篇文章主要为大家详细介绍了Matlab使用Plot函数实现数据动态显示方法,具有一定的参考价值,感兴趣的小伙伴们可以参考一下...2020-04-25
- PHP一个最大的优点就是它对新技术的支持非常轻易,这种语言的可扩展性使得开发人员能够很方便地添加新的模块,而且遍布世界的技术团体的支持和众多扩展模块的支持使得PHP...2016-11-25
- 最近做了一个工具,可以实现代码自动生成,今天整理出来分享给大家,需要的朋友们下面随着小编来一起学习学习吧...2021-05-27
- size()函数用来获取矩阵的行数和列数。接下来通过本文给大家介绍matlab中size()函数的用法,需要的朋友一起学习吧...2016-03-22
- 这篇文章主要介绍了Matlab制作视频并转换成gif动态图的两种方法,第一种方法使用movie(f)直接取生成AVI视频文件,相对来说比较简单,需要的朋友可以参考下...2020-04-25
- 在Python这门语言中,生成器毫无疑问是最有用的特性之一。与此同时,也是使用的最不广泛的Python特性之一。究其原因,主要是因为,在其他主流语言里面没有生成器的概念。本文将详细介绍python迭代器与生成器...2021-06-15
- 这篇文章主要介绍了Python生成器与迭代器,现在可以通过生成器来直接创建一个列表,是由于内存的限制,表的容量肯定是有限的,果我们需要一个包含几百个元素的列表,是每次访问的时候只访问其中的几个,剩下的元素不使用就很浪费内存空间,下面来了解具体内容...2021-11-02
- PHPBB3的百度sitemap生成器代码 <?php 02 error_reporting(0); 03 define('IN_PHPBB', true); 04 $phpbb_root_path = './'; 05 $phpEx = substr(strrchr(__FILE_...2016-11-25
- 一起来看高版本的PHP5.5的迭代生成器的例子,如果各位对于php5.5的这个新功能不了解可以一起进来看看此文章。 PHP5.5引入了迭代生成器的概念,迭代的概念早就在PHP有...2016-11-25
- 这篇文章主要介绍了JS简单编号生成器实现方法,涉及JavaScript针对表单与字符串操作的相关技巧,并附带demo源码供读者下载参考,需要的朋友可以参考下...2016-04-06
- 这篇文章主要为大家详细介绍了MATLAB Delaunay算法提取离散点边界的方法,具有一定的参考价值,感兴趣的小伙伴们可以参考一下...2020-04-25
- 这篇文章主要介绍了python颜色随机生成器的实例代码,代码简单易懂,非常不错,具有一定的参考借鉴价值,需要的朋友可以参考下...2020-04-27