Android自定义Dialog的方法实例
更新时间:2022年6月8日 16:58 点击:275 作者:凉风gg
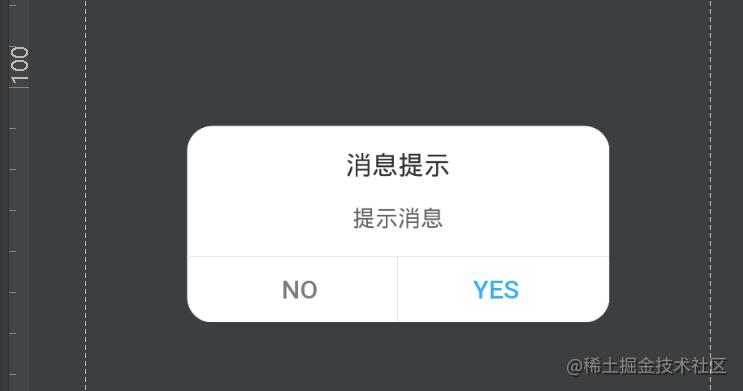
因为公司需要不同样式的dialog,既有取消和确认键 又需要只有确认键的 并且系统自带dialog样式太丑 所以就自己做了个
接下来看代码:
/**
 * Created by  on 2017/9/16.
 * 自定义Dialog
 */

public class MyDialog extends Dialog {
    private Button yes;//确定按钮
    private Button no;//取消按钮
    private TextView titleTv;//消息标题文本
    private TextView messageTv;//消息提示文本
    private String titleStr;//从外界设置的title文本
    private String messageStr;//从外界设置的消息文本
    private View view;
    //确定文本和取消文本的显示内容
    private String yesStr, noStr;

    private onNoOnclickListener noOnclickListener;//取消按钮被点击了的监听器
    private onYesOnclickListener yesOnclickListener;//确定按钮被点击了的监听器

    /**
     * 设置取消按钮的显示内容和监听
     *
     * @param str
     * @param onNoOnclickListener
     */
    public void setNoOnclickListener(String str, onNoOnclickListener onNoOnclickListener) {
        if (str != null) {

            noStr = str;
        }
        this.noOnclickListener = onNoOnclickListener;
    }

    /**
     * 设置确定按钮的显示内容和监听
     *
     * @param str
     * @param onYesOnclickListener
     */
    public void setYesOnclickListener(String str, onYesOnclickListener onYesOnclickListener) {
        if (str != null) {
            yesStr = str;
        }
        this.yesOnclickListener = onYesOnclickListener;
    }

    public MyDialog(Context context) {
        super(context, R.style.MyDialog);
    }

    @Override
    protected void onCreate(Bundle savedInstanceState) {
        super.onCreate(savedInstanceState);
        setContentView(R.layout.mydialog);
        //按空白处不能取消动画
        setCanceledOnTouchOutside(false);
        //初始化界面控件
        initView();
        //初始化界面数据
        initData();
        //初始化界面控件的事件
        initEvent();
    }

    /**
     * 初始化界面的确定和取消监听器
     */
    private void initEvent() {
        //设置确定按钮被点击后,向外界提供监听
        yes.setOnClickListener(new View.OnClickListener() {
            @Override
            public void onClick(View v) {
                if (yesOnclickListener != null) {
                    yesOnclickListener.onYesClick();
                }
            }
        });
        //设置取消按钮被点击后,向外界提供监听
        no.setOnClickListener(new View.OnClickListener() {
            @Override
            public void onClick(View v) {
                if (noOnclickListener != null) {
                    noOnclickListener.onNoClick();
                }
            }
        });
    }

    /**
     * 初始化界面控件的显示数据
     */
    private void initData() {
        //如果用户自定了title和message
        if (titleStr != null) {
            titleTv.setText(titleStr);
        }
        if (messageStr != null) {
            messageTv.setText(messageStr);
        }
        //如果设置按钮的文字
        if (yesStr != null) {
            yes.setText(yesStr);
        }
        if (noStr != null) {
            no.setVisibility(View.VISIBLE);
            view.setVisibility(View.VISIBLE);
            no.setText(noStr);
        } else {
            no.setVisibility(View.GONE);
            view.setVisibility(View.GONE);
        }
    }

    /**
     * 初始化界面控件
     */
    private void initView() {
        yes = (Button) findViewById(R.id.yes);
        no = (Button) findViewById(R.id.no);
        titleTv = (TextView) findViewById(R.id.title);
        messageTv = (TextView) findViewById(R.id.message);
        view = findViewById(R.id.view_dialog);
    }

    /**
     * 从外界Activity为Dialog设置标题
     *
     * @param title
     */
    public void setTitle(String title) {
        titleStr = title;
    }

    /**
     * 从外界Activity为Dialog设置dialog的message
     *
     * @param message
     */
    public void setMessage(String message) {
        messageStr = message;
    }

    /**
     * 设置确定按钮和取消被点击的接口
     */
    public interface onYesOnclickListener {
        public void onYesClick();
    }

    public interface onNoOnclickListener {
        public void onNoClick();
    }
}
Xml文件:
<?xml version="1.0" encoding="utf-8"?>
<RelativeLayout xmlns:android="http://schemas.android.com/apk/res/android"
android:layout_width="match_parent"
android:layout_height="match_parent"
>
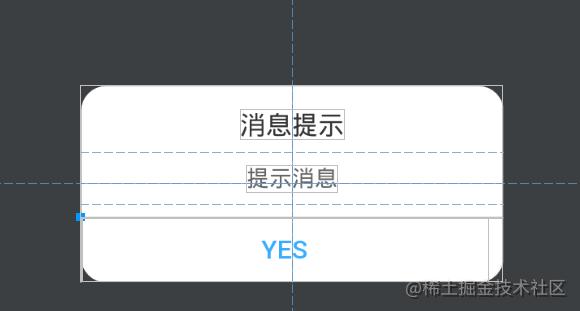
<LinearLayout
android:layout_width="260dp"
android:layout_height="wrap_content"
android:background="@drawable/mydialog_shape"
android:orientation="vertical"
android:layout_centerVertical="true"
android:layout_centerHorizontal="true">
<TextView
android:id="@+id/title"
android:layout_width="wrap_content"
android:layout_height="wrap_content"
android:layout_gravity="center"
android:layout_margin="15dp"
android:gravity="center"
android:text="消息提示"
android:textColor="#333333"
android:textSize="16sp" />
<TextView
android:id="@+id/message"
android:layout_width="wrap_content"
android:layout_height="wrap_content"
android:layout_marginLeft="20dp"
android:layout_marginRight="20dp"
android:layout_gravity="center"
android:textColor="#666666"
android:text="提示消息" />
<View
android:layout_width="match_parent"
android:layout_height="1px"
android:layout_marginTop="15dp"
android:background="#E4E4E4" />
<LinearLayout
android:layout_width="match_parent"
android:layout_height="40dp"
android:orientation="horizontal">
<Button
android:id="@+id/no"
android:layout_width="0dp"
android:layout_height="match_parent"
android:layout_marginLeft="10dp"
android:layout_weight="1"
android:background="@null"
android:gravity="center"
android:singleLine="true"
android:text="No"
android:textColor="#7D7D7D"
android:visibility="gone"
android:textSize="16sp" />
<View
android:id="@+id/view_dialog"
android:layout_width="1px"
android:layout_height="match_parent"
android:background="#E4E4E4" />
<Button
android:id="@+id/yes"
android:layout_width="0dp"
android:layout_height="match_parent"
android:layout_marginRight="10dp"
android:layout_weight="1"
android:background="@null"
android:gravity="center"
android:singleLine="true"
android:text="Yes"
android:textColor="#38ADFF"
android:textSize="16sp" />
</LinearLayout>
</LinearLayout>
</RelativeLayout>
调用的方法:
  myDialog = new MyDialog(activity);
                            myDialog.setTitle("提示");
                            myDialog.setMessage("您输入的关键字未查询到信息,请重新输入");
                            myDialog.setYesOnclickListener("确定", new MyDialog.onYesOnclickListener() {
                                @Override
                                public void onYesClick() {
                                    myDialog.dismiss();
                                }
                            });
                            myDialog.show();
这是一个调用只含有确认键的方法,通过mydialog中传的str来进行判断,gone或者vs:
   if (noStr != null) {
            no.setVisibility(View.VISIBLE);
            view.setVisibility(View.VISIBLE);
            no.setText(noStr);
        } else {
            no.setVisibility(View.GONE);
            view.setVisibility(View.GONE);
        }
调用俩个按键:
    myDialog = new MyDialog(activity);
                    myDialog.setTitle("指纹关闭确认");
                    myDialog.setMessage("确认关闭指纹登陆?");
                    myDialog.setYesOnclickListener("确定", new MyDialog.onYesOnclickListener() {
                        @Override
                        public void onYesClick() {
                            SharedPreferenceUtil.setInfoToShared("Z", "N");
                            myDialog.dismiss();
                        }
                    });
                    myDialog.setNoOnclickListener("取消", new MyDialog.onNoOnclickListener() {
                        @Override
                        public void onNoClick() {
                            cbFingerprint.setChecked(true);
                            myDialog.dismiss();
                        }
                    });
                    myDialog.show();
总结
到此这篇关于Android自定义Dialog的文章就介绍到这了,更多相关Android自定义Dialog内容请搜索猪先飞以前的文章或继续浏览下面的相关文章希望大家以后多多支持猪先飞!
原文出处:https://juejin.cn/post/7106408298059956254
相关文章
- 下面我们来看一篇关于Android子控件超出父控件的范围显示出来方法,希望这篇文章能够帮助到各位朋友,有碰到此问题的朋友可以进来看看哦。 <RelativeLayout xmlns:an...2016-10-02
- 这篇文章主要给大家介绍了关于C#创建自定义控件及添加自定义属性和事件使用的相关资料,文中通过示例代码介绍的非常详细,对大家学习或者使用C#具有一定的参考学习价值,需要的朋友们下面来一起学习学习吧...2020-06-25
- 本文实例讲述了JS实现自定义简单网页软键盘效果。分享给大家供大家参考,具体如下:这是一款自定义的简单点的网页软键盘,没有使用任何控件,仅是为了练习JavaScript编写水平,安全性方面没有过多考虑,有顾虑的可以不用,目的是学...2015-11-08
Android开发中findViewById()函数用法与简化
findViewById方法在android开发中是获取页面控件的值了,有没有发现我们一个页面控件多了会反复研究写findViewById呢,下面我们一起来看它的简化方法。 Android中Fin...2016-09-20- 如果我们的项目需要做来电及短信的功能,那么我们就得在Android模拟器开发这些功能,本来就来告诉我们如何在Android模拟器上模拟来电及来短信的功能。 在Android模拟...2016-09-20
- artDialog是一个基于javascript编写的对话框组件,它拥有精致的界面与友好的接口。本文给大家介绍JS中artdialog弹出框控件之提交表单思路详解,对本文感兴趣的朋友一起学习吧...2016-04-19
- 夜神android模拟器如何设置代理呢?对于这个问题其实操作起来是非常的简单,下面小编来为各位详细介绍夜神android模拟器设置代理的方法,希望例子能够帮助到各位。 app...2016-09-20
- 为了增强android应用的用户体验,我们可以在一些Button按钮上自定义动态的设置一些样式,比如交互时改变字体、颜色、背景图等。 今天来看一个通过重写Button来动态实...2016-09-20
- 如果我们要在Android应用APP中加载html5页面,我们可以使用WebView,本文我们分享两个WebView加载html5页面实例应用。 实例一:WebView加载html5实现炫酷引导页面大多...2016-09-20
- 深入理解Android中View和ViewGroup从组成架构上看,似乎ViewGroup在View之上,View需要继承ViewGroup,但实际上不是这样的。View是基类,ViewGroup是它的子类。本教程我们深...2016-09-20
- 下面我们来看一篇关于Android自定义WebView网络视频播放控件开发例子,这个文章写得非常的不错下面给各位共享一下吧。 因为业务需要,以下代码均以Youtube网站在线视...2016-10-02
- java开发的Android应用,性能一直是一个大问题,,或许是Java语言本身比较消耗内存。本文我们来谈谈Android 性能优化之MemoryFile文件读写。 Android匿名共享内存对外A...2016-09-20
- 自定义一个jquery模态窗口插件,将它集成到现有平台框架中时,它只能在mainFrame窗口中显示,无法在顶层窗口显示. 解决这个问题的办法: 通过以下代码就可能实现在顶层窗口弹窗 复制代码 代码如下: $(window.top.documen...2014-05-31
- 这篇文章主要介绍了自定义feignClient的常见坑及解决方案,具有很好的参考价值,希望对大家有所帮助。如有错误或未考虑完全的地方,望不吝赐教...2021-10-20
- TextView默认是横着显示了,今天我们一起来看看Android设置TextView竖着显示如何来实现吧,今天我们就一起来看看操作细节,具体的如下所示。 在开发Android程序的时候,...2016-10-02
- 今天小编就为大家分享一篇pytorch 自定义卷积核进行卷积操作方式,具有很好的参考价值,希望对大家有所帮助。一起跟随小编过来看看吧...2020-05-06
android.os.BinderProxy cannot be cast to com解决办法
本文章来给大家介绍关于android.os.BinderProxy cannot be cast to com解决办法,希望此文章对各位有帮助呀。 Android在绑定服务的时候出现java.lang.ClassCastExc...2016-09-20- 这篇文章主要介绍了Android 实现钉钉自动打卡功能的步骤,帮助大家更好的理解和学习使用Android,感兴趣的朋友可以了解下...2021-03-15
PHP YII框架开发小技巧之模型(models)中rules自定义验证规则
YII的models中的rules部分是一些表单的验证规则,对于表单验证十分有用,在相应的视图(views)里面添加了表单,在表单被提交之前程序都会自动先来这里面的规则里验证,只有通过对其有效的限制规则后才能被提交,可以很有效地保证...2015-11-24- 这篇文章主要介绍了jquery自定义插件开发之window的实现过程的相关资料,需要的朋友可以参考下...2016-05-09