android开发卡片式视图组件cardview的使用实例
cardview是放在support library v7包中的一个组件,这里讲讲cardview的简单使用。
<span style="font-size:14px;"><android.support.v7.widget.CardView xmlns:android="http://schemas.android.com/apk/res/android"
    xmlns:card_view="http://schemas.android.com/apk/res-auto"
    android:layout_width="match_parent"
    android:layout_height="match_parent"
    android:layout_margin="5dp"
    card_view:cardBackgroundColor="@color/cardview_dark_background"
    card_view:cardCornerRadius="5dp" >

    <RelativeLayout
        android:layout_width="match_parent"
        android:layout_height="100dp"
        android:padding="5dp" >

        <ImageView
            android:id="@+id/pic"
            android:layout_width="match_parent"
            android:layout_height="match_parent"
            android:layout_centerInParent="true"
            android:scaleType="centerCrop" />

        <TextView
            android:clickable="true"
            android:id="@+id/name"
            android:layout_width="match_parent"
            android:layout_height="match_parent"
            android:layout_marginBottom="10dp"
            android:layout_marginRight="10dp"
            android:gravity="right|bottom"
            android:textColor="@android:color/white"
            android:textSize="24sp" />
    </RelativeLayout>

</android.support.v7.widget.CardView> </span>
大概看到,它也就用CardView控件包裹了一下原有的条目布局,宽高依旧使用填充父窗体
layout_margin 表示卡片之间的间隔,这里应该是真实间隔的一半(原因你应该懂的)
cardCornerRadius 表示卡片外围圆角的弧度
cardBackgroundColor表示卡片背景颜色
后两个属性是属于card_view命名空间的,所以在使用的时候不要忘记加上这个命名控件
android-cardview简单使用(二)
ardview是5.0以上版本的控件,是一个卡片式布局,继承framlayout,但是可以使用兼容包老兼容4.0以上的设备。
测试环境是android studio
1.加入依赖:
compile 'com.android.support:cardview-v7:21.0.3'
2.写布局:
<android.support.v7.widget.CardView xmlns:android="http://schemas.android.com/apk/res/android"
    xmlns:app="http://schemas.android.com/apk/res-auto"
    android:id="@+id/card_view"
    android:layout_width="match_parent"
    android:layout_height="wrap_content"
    app:cardCornerRadius="4dp"
    app:cardBackgroundColor="@color/style_color_primary">

    <LinearLayout
        android:layout_width="match_parent"
        android:layout_height="wrap_content">
        <TextView
            android:layout_width="wrap_content"
            android:layout_height="wrap_content"
            android:text="hello cardview!"/>
    </LinearLayout>

</android.support.v7.widget.CardView>
注意:这里有两个属性cardCornerRadius和cardBackgroundColor,已经基本上见名知其意了,第一个是圆角半径,第二个是背景颜色。
还有一个elevator属性,但是只有在5.0以上版本才能显示出来效果啦。
仿下载助手界面效果

线程池 ThreadPoolExecutor
在下面介绍实现下载原理的时候,我想尝试倒着来说,这样是否好理解一点?
我们都知道,下载助手,比如360, 百度的 手机助手,下载APP 的时候 ,都可以同时下载多个,所以,下载肯定是多线程的,所以我们就需要一个线程工具类 来管理我们的线程,这个工具类的核心,就是 线程池。
线程池ThreadPoolExecutor ,先简单学习下这个线程池的使用
/**
* Parameters:
corePoolSize
the number of threads to keep in the pool, even if they are idle, unless allowCoreThreadTimeOut is set
maximumPoolSize
the maximum number of threads to allow in the pool
keepAliveTime
when the number of threads is greater than the core, this is the maximum time that excess idle threads will wait for new tasks before terminating.
unit
the time unit for the keepAliveTime argument
workQueue
the queue to use for holding tasks before they are executed. This queue will hold only the Runnable tasks submitted by the execute method.
handler
the handler to use when execution is blocked because the thread bounds and queue capacities are reached
Throws:
IllegalArgumentException - if one of the following holds:
corePoolSize < 0
keepAliveTime < 0
maximumPoolSize <= 0
maximumPoolSize < corePoolSize
NullPointerException - if workQueue or handler is null
*/
ThreadPoolExecutor threadpool=new ThreadPoolExecutor(corePoolSize, maximumPoolSize, keepAliveTime, unit, workQueue, handler)
上面是 ThreadPoolExecutor的参数介绍,
第一个参数 corePoolSize : 空闲时 存在的线程数目、
第二个参数 maximumPoolSize :允许同时存在的最大线程数、
第三个参数 keepAliveTime: 这个参数是 允许空闲线程存活的时间、
第四个参数 unit : 是 时间的单位 、
第五个参数 workQueue :这个是一个容器,它里面存放的是、 threadpool.execute(new Runnable()) 执行的线程.new Runnable()、
第六个参数 handler:当执行被阻塞时,该处理程序将被阻塞,因为线程的边界和队列容量达到了 。
工具类 ThreadManager
介绍完了 线程池参数,那我们就先创建一个线程管理的工具类 ThreadManager
public class ThreadManager {
public static final String DEFAULT_SINGLE_POOL_NAME = "DEFAULT_SINGLE_POOL_NAME";
private static ThreadPoolProxy mLongPool = null;
private static Object mLongLock = new Object();
private static ThreadPoolProxy mShortPool = null;
private static Object mShortLock = new Object();
private static ThreadPoolProxy mDownloadPool = null;
private static Object mDownloadLock = new Object();
private static Map<String, ThreadPoolProxy> mMap = new HashMap<String, ThreadPoolProxy>();
private static Object mSingleLock = new Object();
/** 获取下载线程 */
public static ThreadPoolProxy getDownloadPool() {
synchronized (mDownloadLock) {
if (mDownloadPool == null) {
mDownloadPool = new ThreadPoolProxy(3, 3, 5L);
}
return mDownloadPool;
}
}
/** 获取一个用于执行长耗时任务的线程池,避免和短耗时任务处在同一个队列而阻塞了重要的短耗时任务,通常用来联网操作 */
public static ThreadPoolProxy getLongPool() {
synchronized (mLongLock) {
if (mLongPool == null) {
mLongPool = new ThreadPoolProxy(5, 5, 5L);
}
return mLongPool;
}
}
/** 获取一个用于执行短耗时任务的线程池,避免因为和耗时长的任务处在同一个队列而长时间得不到执行,通常用来执行本地的IO/SQL */
public static ThreadPoolProxy getShortPool() {
synchronized (mShortLock) {
if (mShortPool == null) {
mShortPool = new ThreadPoolProxy(2, 2, 5L);
}
return mShortPool;
}
}
/** 获取一个单线程池,所有任务将会被按照加入的顺序执行,免除了同步开销的问题 */
public static ThreadPoolProxy getSinglePool() {
return getSinglePool(DEFAULT_SINGLE_POOL_NAME);
}
/** 获取一个单线程池,所有任务将会被按照加入的顺序执行,免除了同步开销的问题 */
public static ThreadPoolProxy getSinglePool(String name) {
synchronized (mSingleLock) {
ThreadPoolProxy singlePool = mMap.get(name);
if (singlePool == null) {
singlePool = new ThreadPoolProxy(1, 1, 5L);
mMap.put(name, singlePool);
}
return singlePool;
}
}
public static class ThreadPoolProxy {
private ThreadPoolExecutor mPool;
private int mCorePoolSize;
private int mMaximumPoolSize;
private long mKeepAliveTime;
private ThreadPoolProxy(int corePoolSize, int maximumPoolSize, long keepAliveTime) {
mCorePoolSize = corePoolSize;
mMaximumPoolSize = maximumPoolSize;
mKeepAliveTime = keepAliveTime;
}
/** 执行任务,当线程池处于关闭,将会重新创建新的线程池 */
public synchronized void execute(Runnable run) {
if (run == null) {
return;
}
if (mPool == null || mPool.isShutdown()) {
mPool = new ThreadPoolExecutor(mCorePoolSize, mMaximumPoolSize, mKeepAliveTime, TimeUnit.MILLISECONDS, new LinkedBlockingQueue<Runnable>(), Executors.defaultThreadFactory(), new AbortPolicy());
}
mPool.execute(run);
}
/** 取消线程池中某个还未执行的任务 */
public synchronized void cancel(Runnable run) {
if (mPool != null && (!mPool.isShutdown() || mPool.isTerminating())) {
mPool.getQueue().remove(run);
}
}
/** 取消线程池中某个还未执行的任务 */
public synchronized boolean contains(Runnable run) {
if (mPool != null && (!mPool.isShutdown() || mPool.isTerminating())) {
return mPool.getQueue().contains(run);
} else {
return false;
}
}
/** 立刻关闭线程池,并且正在执行的任务也将会被中断 */
public void stop() {
if (mPool != null && (!mPool.isShutdown() || mPool.isTerminating())) {
mPool.shutdownNow();
}
}
/** 平缓关闭单任务线程池,但是会确保所有已经加入的任务都将会被执行完毕才关闭 */
public synchronized void shutdown() {
if (mPool != null && (!mPool.isShutdown() || mPool.isTerminating())) {
mPool.shutdownNow();
}
}
}
}
这个线程池工具类 主要就是 生成一个线程池, 以及 取消线程池中的任务,查询线程池中是否包含某一任务。
下载任务 DownloadTask
我们的现在线程 DownloadTask 就 通过 ThreadManager .getDownloadPool().execute() 方法 交给线程池去管理。
有了线程池管理我们的线程, 那我们下一步 就是 DownloadTask 这个类去下载了。
/** 下载任务 */
public class DownloadTask implements Runnable {
private DownloadInfo info;
public DownloadTask(DownloadInfo info) {
this.info = info;
}
@Override
public void run() {
info.setDownloadState(STATE_DOWNLOADING);// 先改变下载状态
notifyDownloadStateChanged(info);
File file = new File(info.getPath());// 获取下载文件
HttpResult httpResult = null;
InputStream stream = null;
if (info.getCurrentSize() == 0 || !file.exists()
|| file.length() != info.getCurrentSize()) {
// 如果文件不存在,或者进度为0,或者进度和文件长度不相符,就需要重新下载
info.setCurrentSize(0);
file.delete();
}
httpResult = HttpHelper.download(info.getUrl());
// else {
// // //文件存在且长度和进度相等,采用断点下载
// httpResult = HttpHelper.download(info.getUrl() + "&range=" +
// info.getCurrentSize());
// }
if (httpResult == null
|| (stream = httpResult.getInputStream()) == null) {
info.setDownloadState(STATE_ERROR);// 没有下载内容返回,修改为错误状态
notifyDownloadStateChanged(info);
} else {
try {
skipBytesFromStream(stream, info.getCurrentSize());
} catch (Exception e1) {
e1.printStackTrace();
}
FileOutputStream fos = null;
try {
fos = new FileOutputStream(file, true);
int count = -1;
byte[] buffer = new byte[1024];
while (((count = stream.read(buffer)) != -1)
&& info.getDownloadState() == STATE_DOWNLOADING) {
// 每次读取到数据后,都需要判断是否为下载状态,如果不是,下载需要终止,如果是,则刷新进度
fos.write(buffer, 0, count);
fos.flush();
info.setCurrentSize(info.getCurrentSize() + count);
notifyDownloadProgressed(info);// 刷新进度
}
} catch (Exception e) {
info.setDownloadState(STATE_ERROR);
notifyDownloadStateChanged(info);
info.setCurrentSize(0);
file.delete();
} finally {
IOUtils.close(fos);
if (httpResult != null) {
httpResult.close();
}
}
// 判断进度是否和app总长度相等
if (info.getCurrentSize() == info.getAppSize()) {
info.setDownloadState(STATE_DOWNLOADED);
notifyDownloadStateChanged(info);
} else if (info.getDownloadState() == STATE_PAUSED) {// 判断状态
notifyDownloadStateChanged(info);
} else {
info.setDownloadState(STATE_ERROR);
notifyDownloadStateChanged(info);
info.setCurrentSize(0);// 错误状态需要删除文件
file.delete();
}
}
mTaskMap.remove(info.getId());
}
}
下载的原理 很简单,就是 通过 目标的URL 拿到流,然后写到本地。
因为下载在 run() 里面执行,这个DownloadTask 类 我们就看run() 方法的实现,所以 关键代码 就是下面一点点
fos = new FileOutputStream(file, true);
int count = -1;
byte[] buffer = new byte[1024];
while (((count = stream.read(buffer)) != -1)
&& info.getDownloadState() == STATE_DOWNLOADING) {
// 每次读取到数据后,都需要判断是否为下载状态,如果不是,下载需要终止,如果是,则刷新进度
fos.write(buffer, 0, count);
fos.flush();
info.setCurrentSize(info.getCurrentSize() + count);
notifyDownloadProgressed(info);// 刷新进度
}
这个在我们刚接触Java 的时候 肯定都写过了。 这就是往本地写数据的代码。所以run()方法中的 前面 就是拿到 stream 输入流, 以及 把file 创建出来。
刷新进度,状态
关于控制 button中text 显示 暂停 ,下载,还是进度,就靠 notifyDownloadProgressed(info);和 notifyDownloadStateChanged(info)两个方法, 这两个方法 实际上调用的是两个接口,只要我们在我们需要改变界面的类里 实现这两个接口,就可以接收到 包含最新信息的info对象。而我们在哪个类里改变button 上面 显示的文字呢? 当然是在 我们的adapter 里面了,大家都知道 是在 adapter 的getView() 方法里面 加载的每一条数据的布局。
那就一起看下是不是这样子呢?
public class RecommendAdapter extends BaseAdapter implements
DownloadManager.DownloadObserver {
ArrayList<AppInfo> list;
private List<ViewHolder> mDisplayedHolders;
private FinalBitmap finalBitmap;
private Context context;
public RecommendAdapter(ArrayList<AppInfo> list, FinalBitmap finalBitmap,
Context context) {
this.list = list;
this.context = context;
this.finalBitmap = finalBitmap;
mDisplayedHolders = new ArrayList<ViewHolder>();
}
public void startObserver() {
DownloadManager.getInstance().registerObserver(this);
}
public void stopObserver() {
DownloadManager.getInstance().unRegisterObserver(this);
}
@Override
public int getCount() {
return list.size();
}
@Override
public Object getItem(int position) {
return list.get(position);
}
@Override
public long getItemId(int position) {
return position;
}
@Override
public View getView(int position, View convertView, ViewGroup parent) {
final AppInfo appInfo = list.get(position);
final ViewHolder holder;
if (convertView == null) {
holder = new ViewHolder(context);
} else {
holder = (ViewHolder) convertView.getTag();
}
holder.setData(appInfo);
mDisplayedHolders.add(holder);
return holder.getRootView();
}
@Override
public void onDownloadStateChanged(DownloadInfo info) {
refreshHolder(info);
}
@Override
public void onDownloadProgressed(DownloadInfo info) {
refreshHolder(info);
}
public List<ViewHolder> getDisplayedHolders() {
synchronized (mDisplayedHolders) {
return new ArrayList<ViewHolder>(mDisplayedHolders);
}
}
public void clearAllItem() {
if (list != null){
list.clear();
}
if (mDisplayedHolders != null) {
mDisplayedHolders.clear();
}
}
public void addItems(ArrayList<AppInfo> infos) {
list.addAll(infos);
}
private void refreshHolder(final DownloadInfo info) {
List<ViewHolder> displayedHolders = getDisplayedHolders();
for (int i = 0; i < displayedHolders.size(); i++) {
final ViewHolder holder = displayedHolders.get(i);
AppInfo appInfo = holder.getData();
if (appInfo.getId() == info.getId()) {
AppUtil.post(new Runnable() {
@Override
public void run() {
holder.refreshState(info.getDownloadState(),
info.getProgress());
}
});
}
}
}
public class ViewHolder {
public TextView textView01;
public TextView textView02;
public TextView textView03;
public TextView textView04;
public ImageView imageView_icon;
public Button button;
public LinearLayout linearLayout;
public AppInfo mData;
private DownloadManager mDownloadManager;
private int mState;
private float mProgress;
protected View mRootView;
private Context context;
private boolean hasAttached;
public ViewHolder(Context context) {
mRootView = initView();
mRootView.setTag(this);
this.context = context;
}
public View getRootView() {
return mRootView;
}
public View initView() {
View view = AppUtil.inflate(R.layout.item_recommend_award);
imageView_icon = (ImageView) view
.findViewById(R.id.imageview_task_app_cion);
textView01 = (TextView) view
.findViewById(R.id.textview_task_app_name);
textView02 = (TextView) view
.findViewById(R.id.textview_task_app_size);
textView03 = (TextView) view
.findViewById(R.id.textview_task_app_desc);
textView04 = (TextView) view
.findViewById(R.id.textview_task_app_love);
button = (Button) view.findViewById(R.id.button_task_download);
linearLayout = (LinearLayout) view
.findViewById(R.id.linearlayout_task);
button.setOnClickListener(new OnClickListener() {
@Override
public void onClick(View v) {
System.out.println("mState:173 "+mState);
if (mState == DownloadManager.STATE_NONE
|| mState == DownloadManager.STATE_PAUSED
|| mState == DownloadManager.STATE_ERROR) {
mDownloadManager.download(mData);
} else if (mState == DownloadManager.STATE_WAITING
|| mState == DownloadManager.STATE_DOWNLOADING) {
mDownloadManager.pause(mData);
} else if (mState == DownloadManager.STATE_DOWNLOADED) {
// tell2Server();
mDownloadManager.install(mData);
}
}
});
return view;
}
public void setData(AppInfo data) {
if (mDownloadManager == null) {
mDownloadManager = DownloadManager.getInstance();
}
String filepath= FileUtil.getDownloadDir(AppUtil.getContext()) + File.separator + data.getName() + ".apk";
boolean existsFile = FileUtil.isExistsFile(filepath);
if(existsFile){
int fileSize = FileUtil.getFileSize(filepath);
if(data.getSize()==fileSize){
DownloadInfo downloadInfo = DownloadInfo.clone(data);
downloadInfo.setCurrentSize(data.getSize());
downloadInfo.setHasFinished(true);
mDownloadManager.setDownloadInfo(data.getId(),downloadInfo );
}
// else if(fileSize>0){
// DownloadInfo downloadInfo = DownloadInfo.clone(data);
// downloadInfo.setCurrentSize(data.getSize());
// downloadInfo.setHasFinished(false);
// mDownloadManager.setDownloadInfo(data.getId(),downloadInfo );
// }
}
DownloadInfo downloadInfo = mDownloadManager.getDownloadInfo(data
.getId());
if (downloadInfo != null) {
mState = downloadInfo.getDownloadState();
mProgress = downloadInfo.getProgress();
} else {
mState = DownloadManager.STATE_NONE;
mProgress = 0;
}
this.mData = data;
refreshView();
}
public AppInfo getData() {
return mData;
}
public void refreshView() {
linearLayout.removeAllViews();
AppInfo info = getData();
textView01.setText(info.getName());
textView02.setText(FileUtil.FormetFileSize(info.getSize()));
textView03.setText(info.getDes());
textView04.setText(info.getDownloadNum() + "下载量);
finalBitmap.display(imageView_icon, info.getIconUrl());
if (info.getType().equals("0")) {
// mState = DownloadManager.STATE_READ;
textView02.setVisibility(View.GONE);
}else{
String path=FileUtil.getDownloadDir(AppUtil.getContext()) + File.separator + info.getName() + ".apk";
hasAttached = FileUtil.isValidAttach(path, false);
DownloadInfo downloadInfo = mDownloadManager.getDownloadInfo(info
.getId());
if (downloadInfo != null && hasAttached) {
if(downloadInfo.isHasFinished()){
mState = DownloadManager.STATE_DOWNLOADED;
}else{
mState = DownloadManager.STATE_PAUSED;
}
} else {
mState = DownloadManager.STATE_NONE;
if(downloadInfo !=null){
downloadInfo.setDownloadState(mState);
}
}
}
refreshState(mState, mProgress);
}
public void refreshState(int state, float progress) {
mState = state;
mProgress = progress;
switch (mState) {
case DownloadManager.STATE_NONE:
button.setText(R.string.app_state_download);
break;
case DownloadManager.STATE_PAUSED:
button.setText(R.string.app_state_paused);
break;
case DownloadManager.STATE_ERROR:
button.setText(R.string.app_state_error);
break;
case DownloadManager.STATE_WAITING:
button.setText(R.string.app_state_waiting);
break;
case DownloadManager.STATE_DOWNLOADING:
button.setText((int) (mProgress * 100) + "%");
break;
case DownloadManager.STATE_DOWNLOADED:
button.setText(R.string.app_state_downloaded);
break;
// case DownloadManager.STATE_READ:
// button.setText(R.string.app_state_read);
// break;
default:
break;
}
}
}
}
何时 注册 监听observer
里面代码有点多,那就看startObserver()方法做了什么。
public void startObserver() {
DownloadManager.getInstance().registerObserver(this);
}
这里 是 注册了observer, Observer 是什么东西?在DownloadManager 中我们定义了
public interface DownloadObserver {
public void onDownloadStateChanged(DownloadInfo info);
public void onDownloadProgressed(DownloadInfo info);
}
一个接口,里面有两个抽象方法 一个是 进度,另一个是下载状态。
那回过头来,屡一下, 我们在 下载的关键代码里面调用了 DownloadObserver onDownloadProgressed() DownloadObserver.onDownloadStateChanged()两个抽象方法,而我们在 adapter
@Override
public void onDownloadStateChanged(DownloadInfo info) {
refreshHolder(info);
}
@Override
public void onDownloadProgressed(DownloadInfo info) {
refreshHolder(info);
}
中实现了 这两个方法 就可以轻松的控制 去 刷新 和改变 下载状态了。
细心的朋友 或许 发现问题了,对,我们还没有注册Observer,就在 DownloadManager 中去调用了。
这里 在看下DownloadManager 中 调用的方法
/** 当下载状态发送改变的时候回调 */
public void notifyDownloadStateChanged(DownloadInfo info) {
synchronized (mObservers) {
for (DownloadObserver observer : mObservers) {
observer.onDownloadStateChanged(info);
}
}
}
/** 当下载进度发送改变的时候回调 */
public void notifyDownloadProgressed(DownloadInfo info) {
synchronized (mObservers) {
for (DownloadObserver observer : mObservers) {
observer.onDownloadProgressed(info);
}
}
}
是的,这里我们遍历一个observer 容器,然后去刷新 ,所以我们还需要 把 Observer 对象 添加到 集合 mObservers 中,
所以肯定有这样一个方法 讲 observer 添加到集合中 。
/* 注册观察者 /
public void registerObserver(DownloadObserver observer) {
synchronized (mObservers) {
if (!mObservers.contains(observer)) {
mObservers.add(observer);
}
}
}
/** 反注册观察者 */
public void unRegisterObserver(DownloadObserver observer) {
synchronized (mObservers) {
if (mObservers.contains(observer)) {
mObservers.remove(observer);
}
}
}
所以最后一步,因为 adapter 方法中有 startObserver, 所以 我们在 主界面 MainActivity 的类中调用 adapter.startObser() 将 实现了 接口的adapter 对象 添加到 Observer 容器中 就可以了。
OK。大功告成!
=============================================
DownloadManager 代码
这里 贴一下DownloadManager 代码
public class DownloadManager {
public static final int STATE_NONE = 0;
/** 等待中 */
public static final int STATE_WAITING = 1;
/** 下载中 */
public static final int STATE_DOWNLOADING = 2;
/** 暂停 */
public static final int STATE_PAUSED = 3;
/** 下载完毕 */
public static final int STATE_DOWNLOADED = 4;
/** 下载失败 */
public static final int STATE_ERROR = 5;
// public static final int STATE_READ = 6;
private static DownloadManager instance;
private DownloadManager() {
}
/** 用于记录下载信息,如果是正式项目,需要持久化保存 */
private Map<Long, DownloadInfo> mDownloadMap = new ConcurrentHashMap<Long, DownloadInfo>();
/** 用于记录观察者,当信息发送了改变,需要通知他们 */
private List<DownloadObserver> mObservers = new ArrayList<DownloadObserver>();
/** 用于记录所有下载的任务,方便在取消下载时,通过id能找到该任务进行删除 */
private Map<Long, DownloadTask> mTaskMap = new ConcurrentHashMap<Long, DownloadTask>();
public static synchronized DownloadManager getInstance() {
if (instance == null) {
instance = new DownloadManager();
}
return instance;
}
/** 注册观察者 */
public void registerObserver(DownloadObserver observer) {
synchronized (mObservers) {
if (!mObservers.contains(observer)) {
mObservers.add(observer);
}
}
}
/** 反注册观察者 */
public void unRegisterObserver(DownloadObserver observer) {
synchronized (mObservers) {
if (mObservers.contains(observer)) {
mObservers.remove(observer);
}
}
}
/** 当下载状态发送改变的时候回调 */
public void notifyDownloadStateChanged(DownloadInfo info) {
synchronized (mObservers) {
for (DownloadObserver observer : mObservers) {
observer.onDownloadStateChanged(info);
}
}
}
/** 当下载进度发送改变的时候回调 */
public void notifyDownloadProgressed(DownloadInfo info) {
synchronized (mObservers) {
for (DownloadObserver observer : mObservers) {
observer.onDownloadProgressed(info);
}
}
}
/** 下载,需要传入一个appInfo对象 */
public synchronized void download(AppInfo appInfo) {
// 先判断是否有这个app的下载信息
DownloadInfo info = mDownloadMap.get(appInfo.getId());
if (info == null) {// 如果没有,则根据appInfo创建一个新的下载信息
info = DownloadInfo.clone(appInfo);
mDownloadMap.put(appInfo.getId(), info);
}
// 判断状态是否为STATE_NONE、STATE_PAUSED、STATE_ERROR。只有这3种状态才能进行下载,其他状态不予处理
if (info.getDownloadState() == STATE_NONE
|| info.getDownloadState() == STATE_PAUSED
|| info.getDownloadState() == STATE_ERROR) {
// 下载之前,把状态设置为STATE_WAITING,因为此时并没有产开始下载,只是把任务放入了线程池中,当任务真正开始执行时,才会改为STATE_DOWNLOADING
info.setDownloadState(STATE_WAITING);
notifyDownloadStateChanged(info);// 每次状态发生改变,都需要回调该方法通知所有观察者
DownloadTask task = new DownloadTask(info);// 创建一个下载任务,放入线程池
mTaskMap.put(info.getId(), task);
ThreadManager.getDownloadPool().execute(task);
}
}
/** 暂停下载 */
public synchronized void pause(AppInfo appInfo) {
stopDownload(appInfo);
DownloadInfo info = mDownloadMap.get(appInfo.getId());// 找出下载信息
if (info != null) {// 修改下载状态
info.setDownloadState(STATE_PAUSED);
notifyDownloadStateChanged(info);
}
}
/** 取消下载,逻辑和暂停类似,只是需要删除已下载的文件 */
public synchronized void cancel(AppInfo appInfo) {
stopDownload(appInfo);
DownloadInfo info = mDownloadMap.get(appInfo.getId());// 找出下载信息
if (info != null) {// 修改下载状态并删除文件
info.setDownloadState(STATE_NONE);
notifyDownloadStateChanged(info);
info.setCurrentSize(0);
File file = new File(info.getPath());
file.delete();
}
}
/** 安装应用 */
public synchronized void install(AppInfo appInfo) {
stopDownload(appInfo);
DownloadInfo info = mDownloadMap.get(appInfo.getId());// 找出下载信息
if (info != null) {// 发送安装的意图
Intent installIntent = new Intent(Intent.ACTION_VIEW);
installIntent.setFlags(Intent.FLAG_ACTIVITY_NEW_TASK);
installIntent.setDataAndType(Uri.parse("file://" + info.getPath()),
"application/vnd.android.package-archive");
AppUtil.getContext().startActivity(installIntent);
}
notifyDownloadStateChanged(info);
}
/** 启动应用,启动应用是最后一个 */
public synchronized void open(AppInfo appInfo) {
try {
Context context = AppUtil.getContext();
// 获取启动Intent
Intent intent = context.getPackageManager()
.getLaunchIntentForPackage(appInfo.getPackageName());
context.startActivity(intent);
} catch (Exception e) {
}
}
/** 如果该下载任务还处于线程池中,且没有执行,先从线程池中移除 */
private void stopDownload(AppInfo appInfo) {
DownloadTask task = mTaskMap.remove(appInfo.getId());// 先从集合中找出下载任务
if (task != null) {
ThreadManager.getDownloadPool().cancel(task);// 然后从线程池中移除
}
}
/** 获取下载信息 */
public synchronized DownloadInfo getDownloadInfo(long id) {
return mDownloadMap.get(id);
}
public synchronized void setDownloadInfo(long id, DownloadInfo info) {
mDownloadMap.put(id, info);
}
/** 下载任务 */
public class DownloadTask implements Runnable {
private DownloadInfo info;
public DownloadTask(DownloadInfo info) {
this.info = info;
}
@Override
public void run() {
info.setDownloadState(STATE_DOWNLOADING);// 先改变下载状态
notifyDownloadStateChanged(info);
File file = new File(info.getPath());// 获取下载文件
HttpResult httpResult = null;
InputStream stream = null;
if (info.getCurrentSize() == 0 || !file.exists()
|| file.length() != info.getCurrentSize()) {
// 如果文件不存在,或者进度为0,或者进度和文件长度不相符,就需要重新下载
info.setCurrentSize(0);
file.delete();
}
httpResult = HttpHelper.download(info.getUrl());
// else {
// // //文件存在且长度和进度相等,采用断点下载
// httpResult = HttpHelper.download(info.getUrl() + "&range=" +
// info.getCurrentSize());
// }
if (httpResult == null
|| (stream = httpResult.getInputStream()) == null) {
info.setDownloadState(STATE_ERROR);// 没有下载内容返回,修改为错误状态
notifyDownloadStateChanged(info);
} else {
try {
skipBytesFromStream(stream, info.getCurrentSize());
} catch (Exception e1) {
e1.printStackTrace();
}
FileOutputStream fos = null;
try {
fos = new FileOutputStream(file, true);
int count = -1;
byte[] buffer = new byte[1024];
while (((count = stream.read(buffer)) != -1)
&& info.getDownloadState() == STATE_DOWNLOADING) {
// 每次读取到数据后,都需要判断是否为下载状态,如果不是,下载需要终止,如果是,则刷新进度
fos.write(buffer, 0, count);
fos.flush();
info.setCurrentSize(info.getCurrentSize() + count);
notifyDownloadProgressed(info);// 刷新进度
}
} catch (Exception e) {
info.setDownloadState(STATE_ERROR);
notifyDownloadStateChanged(info);
info.setCurrentSize(0);
file.delete();
} finally {
IOUtils.close(fos);
if (httpResult != null) {
httpResult.close();
}
}
// 判断进度是否和app总长度相等
if (info.getCurrentSize() == info.getAppSize()) {
info.setDownloadState(STATE_DOWNLOADED);
notifyDownloadStateChanged(info);
} else if (info.getDownloadState() == STATE_PAUSED) {// 判断状态
notifyDownloadStateChanged(info);
} else {
info.setDownloadState(STATE_ERROR);
notifyDownloadStateChanged(info);
info.setCurrentSize(0);// 错误状态需要删除文件
file.delete();
}
}
mTaskMap.remove(info.getId());
}
}
public interface DownloadObserver {
public abstract void onDownloadStateChanged(DownloadInfo info);
public abstract void onDownloadProgressed(DownloadInfo info);
}
/* 重写了Inpustream 中的skip(long n) 方法,将数据流中起始的n 个字节跳过 */
private long skipBytesFromStream(InputStream inputStream, long n) {
long remaining = n;
// SKIP_BUFFER_SIZE is used to determine the size of skipBuffer
int SKIP_BUFFER_SIZE = 10000;
// skipBuffer is initialized in skip(long), if needed.
byte[] skipBuffer = null;
int nr = 0;
if (skipBuffer == null) {
skipBuffer = new byte[SKIP_BUFFER_SIZE];
}
byte[] localSkipBuffer = skipBuffer;
if (n <= 0) {
return 0;
}
while (remaining > 0) {
try {
long skip = inputStream.skip(10000);
nr = inputStream.read(localSkipBuffer, 0,
(int) Math.min(SKIP_BUFFER_SIZE, remaining));
} catch (IOException e) {
e.printStackTrace();
}
if (nr < 0) {
break;
}
remaining -= nr;
}
return n - remaining;
}
}
有两点 需要说明,关于 点击暂停后,再继续下载 有两种方式可以实现
第一种 点击暂停的时候 记录下载了 多少,然后 再点击 继续下载 时,告诉服务器, 让服务器接着 上次的数据 往本地传递,
代码 就是 我们 DownloadTask 下载时候,判断一下
// //文件存在且长度和进度相等,采用断点下载
httpResult = HttpHelper.download(info.getUrl() + "&range=" + info.getCurrentSize());
通过 range 来区分 当前的下载size.
服务器 处理的代码 也很简单 就是一句话
String range = req.getParameter(“range”); 拿到 range 判断 range 存在不存在。
如果不存在
FileInputStream stream = new FileInputStream(file);
int count = -1;
byte[] buffer = new byte[1024];
while ((count = stream.read(buffer)) != -1) {
SystemClock.sleep(20);
out.write(buffer, 0, count);
out.flush();
}
stream.close();
out.close();
如果存在 那么跳过range 个字节
RandomAccessFile raf = new RandomAccessFile(file, "r");
raf.seek(Long.valueOf(range));
int count = -1;
byte[] buffer = new byte[1024];
while ((count = raf.read(buffer)) != -1) {
SystemClock.sleep(10);
out.write(buffer, 0, count);
out.flush();
}
raf.close();
out.close();
另一种方式是本地处理,这个demo 中就是本地处理的, 但是有一个问题, 因为 Java api的原因 ,inputStream.skip() 方法 并不能准确的 跳过多少个字节,
而是 小于你想要跳过的字节,所以 你要去遍历 一直到 满足你要跳过的字节 在继续写, 因为 这样的方法有一个缺点,就是在下载很大的文件,
比如文件大小20M ,当已经下载了15M 此时你去暂停,在继续下载,那么要跳过前面的15M 将会话费很多时间。
所以这个仅限于学习。实际中 如果要下载大的文件,不能用这种方法。
Android 之多线程下载原理
在Android之中呢,对于多线程的操作很是平凡,所以对于多线程的理解越深,那么对于自己的程序便能够很好的运行
这也是对于Android开发是一个重要的知识点,那么我们现在来了解多线程的下载原理。
android 多线程下载
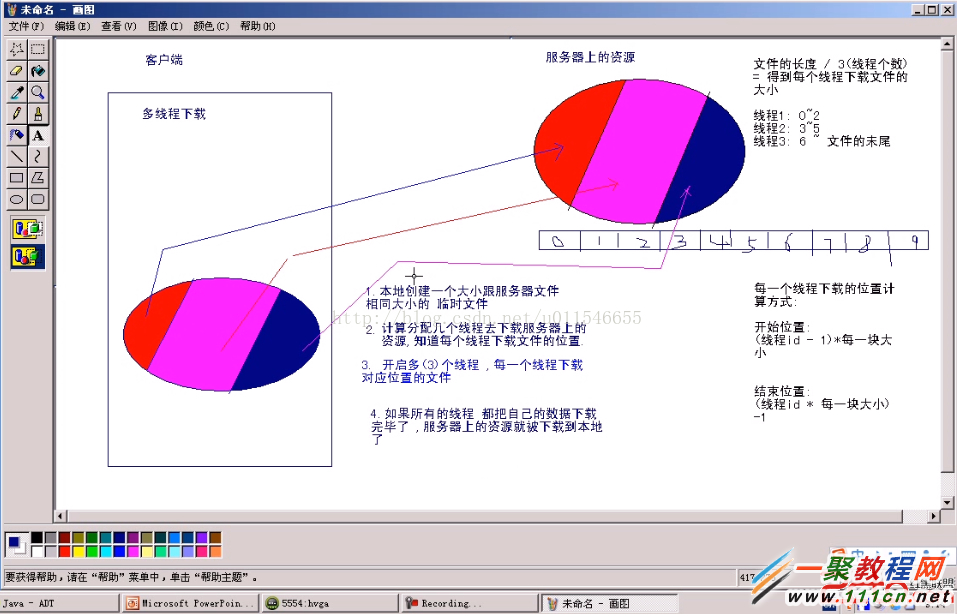
多线程下载步骤: 1.本地创建一个跟服务器一样的大小一样的文件 临时文件。 2.计算分配几个线程去下载服务器上的资源 每个文件下载的位置。 3.开启线程,每一个线程下载对应的文件。 4.如果所有的线程都把自己的数据下载完成了,服务器上的资源就被下载到本地了
如图所示:(假设有三个线程在进行下载)
vcq9Cr+qyrzOu9bDo7oKo6jP37PMaWQgLSAxo6kgKiDDv9K7uPa/7LXEtPPQoQq94cr4zrvWw6O6IAqjqM/fs8xpZKOpKiDDv9K7v+y1xLTz0KEgLSAxCjxicj4KCs/Cw+ajrM7Sw8fPyNPDamF2YbT6wuvAtMq1z9bSu8/CCnBhY2thZ2UgY29tLnplbmd0YW8uZGVtbzs8YnI+Cjxicj4KPGJyPgppbXBvcnQgamF2YS5pby5JbnB1dFN0cmVhbTs8YnI+CmltcG9ydCBqYXZhLmlvLlJhbmRvbUFjY2Vzc0ZpbGU7PGJyPgppbXBvcnQgamF2YS5uZXQuSHR0cFVSTENvbm5lY3Rpb247PGJyPgppbXBvcnQgamF2YS5uZXQuVVJMOzxicj4KPGJyPgo8YnI+CnB1YmxpYyBjbGFzcyBEZW1vTG9hZGVyIHs8YnI+CnByaXZhdGUgc3RhdGljIERlbW9Mb2FkZXIgbG9hZGVyID0gbmV3IERlbW9Mb2FkZXIoKTs8YnI+CnByaXZhdGUgc3RhdGljIGludCB0aHJlYWRDb3VudCA9IDM7PGJyPgo8YnI+Cjxicj4KcHJpdmF0ZSBEZW1vTG9hZGVyKCkgezxicj4KPGJyPgo8YnI+Cn08YnI+Cjxicj4KLy8gtaXA/cnovMbEo8q9PGJyPgpwdWJsaWMgc3RhdGljIERlbW9Mb2FkZXIgZ2V0SW5zdGFuY2UoKSB7PGJyPgpyZXR1cm4gbG9hZGVyOzxicj4KfTxicj4KPGJyPgo8YnI+CnB1YmxpYyB2b2lkIGRvd25GaWxlKFN0cmluZyBwYXRoKSB7PGJyPgovLyDIpbf+zvHG97bLu/HIoc7EvP61xLOktsgs1NqxvrXYtLS9qNK7uPa4+rf+zvHG99K70fm089ChtcTOxLz+PGJyPgp0cnkgezxicj4KVVJMIHVybCA9IG5ldyBVUkwocGF0aCk7PGJyPgpIdHRwVVJMQ29ubmVjdGlvbiBjb25uZWN0aW9uID0gKEh0dHBVUkxDb25uZWN0aW9uKSB1cmw8YnI+Ci5vcGVuQ29ubmVjdGlvbigpOzxicj4KY29ubmVjdGlvbi5zZXREb0lucHV0KHRydWUpOzxicj4KY29ubmVjdGlvbi5zZXRSZXF1ZXN0TWV0aG9kKA=="GET");
connection.setReadTimeout(5000);
int code = connection.getResponseCode();
if (code == 200) {
// 获取服务器端文件的长度
int fileLength = connection.getContentLength();
// 本地创建一个跟服务器一样大小的文件
RandomAccessFile raf = new RandomAccessFile("setup.ext", "rwd");
raf.setLength(fileLength);
raf.close();
// 假设三个线程下载
int blockSize = fileLength / threadCount;
for (int threadId = 0; threadId < threadCount; threadId++) {
int startIndex = (threadId - 1) * blockSize;
int endIndex = threadId * blockSize - 1;
if (threadId == threadCount) {
endIndex = fileLength;
}
System.out.println("线程:" + threadId + ",下载:" + startIndex
+ "--->" + endIndex);
// 开始下载
new DownLoadThread(threadId, startIndex, endIndex, path)
.start();
}
System.out.println("文件总长度为:" + fileLength);
} else {
System.out.println("请求失败!");
}
} catch (Exception e) {
e.printStackTrace();
}
}
/**
* 下载文件的主线程
*
* @author Administrator zengtao
*
*/
public class DownLoadThread extends Thread {
private int threadId;
private int startIndex;
private int endIndex;
private String path;
/**
*
* @param threadId
* 线程id
* @param startIndex
* 线程下载开始位置
* @param endIndex
* 线程下载结束位置
* @param path
* 线程下载结束文件放置地址
*/
public DownLoadThread(int threadId, int startIndex, int endIndex,
String path) {
super();
this.threadId = threadId;
this.startIndex = startIndex;
this.endIndex = endIndex;
this.path = path;
}
@Override
public void run() {
super.run();
URL url;
try {
url = new URL(path);
HttpURLConnection connection = (HttpURLConnection) url
.openConnection();
// 请求服务器下载部分的文件,制定开始的位置,和结束位置
connection.setRequestProperty("Range", "bytes=" + startIndex
+ "-" + endIndex);
connection.setDoInput(true);
connection.setRequestMethod("GET");
connection.setReadTimeout(5000);
// 从服务器获取的全部数据,返回:200,从服务器获取部分数据,返回:206
int code = connection.getResponseCode();
System.out.println("code = " + code);
InputStream is = connection.getInputStream();
RandomAccessFile raf = new RandomAccessFile("setup.exe", "rwd");
// 随机写文件的时候,从什么时候开始
raf.seek(startIndex);
int len = 0;
byte[] buff = new byte[1024];
while ((len = is.read(buff)) != -1) {
raf.write(buff, 0, len);
}
is.close();
raf.close();
System.out.println("线程:" + threadId + ",下载完成");
} catch (Exception e) {
e.printStackTrace();
}
}
}
}
要使用该类的时候,只需要知道一个url地址,然后调用里面的downFile()方法,就会开始下载文件了,这样实现可以下载一个安装包,比如:在网上下载一个qq,微信等的安装包,自己安装到电脑上,便可以用该方法实现。
ListView控件是Android应用开发中原生控件中最复杂,但是又相当的重要,当应用程序要处理很多内容而且屏幕无法公完全显示的时候,ListView就可以发挥其作用了,他可以滑动手指就能把超出屏幕的部分内容移动显示到屏幕中。
ListView还有一个非常神奇的功能,即使在ListView中加载非常非常多的数据,比如达到成百上千条甚至更多,ListView都不会发生OOM或者崩溃,而且随着我们手指滑动来浏览更多数据时,程序所占用的内存竟然都不会跟着增长。那么ListView是怎么实现这么神奇的功能的呢?当初我就抱着学习的心态花了很长时间把ListView的源码通读了一遍,基本了解了它的工作原理,在感叹Google大神能够写出如此精妙代码的同时我也有所敬畏,因为ListView的代码量比较大,复杂度也很高,很难用文字表达清楚,于是我就放弃了把它写成一篇博客的想法。那么现在回想起来这件事我已经肠子都悔青了,因为没过几个月时间我就把当初梳理清晰的源码又忘的一干二净。于是现在我又重新定下心来再次把ListView的源码重读了一遍,那么这次我一定要把它写成一篇博客,分享给大家的同时也当成我自己的笔记吧。
首先我们先来看一下ListView的继承结构,如下图所示:

可以看到,ListView的继承结构还是相当复杂的,它是直接继承自的AbsListView,而AbsListView有两个子实现类,一个是ListView,另一个就是GridView,因此我们从这一点就可以猜出来,ListView和GridView在工作原理和实现上都是有很多共同点的。然后AbsListView又继承自AdapterView,AdapterView继承自ViewGroup,后面就是我们所熟知的了。先把ListView的继承结构了解一下,待会儿有助于我们更加清晰地分析代码。
Adapter的作用
Adapter相信大家都不会陌生,我们平时使用ListView的时候一定都会用到它。那么话说回来大家有没有仔细想过,为什么需要Adapter这个东西呢?总感觉正因为有了Adapter,ListView的使用变得要比其它控件复杂得多。那么这里我们就先来学习一下Adapter到底起到了什么样的一个作用。
其实说到底,控件就是为了交互和展示数据用的,只不过ListView更加特殊,它是为了展示很多很多数据用的,但是ListView只承担交互和展示工作而已,至于这些数据来自哪里,ListView是不关心的。因此,我们能设想到的最基本的ListView工作模式就是要有一个ListView控件和一个数据源。
不过如果真的让ListView和数据源直接打交道的话,那ListView所要做的适配工作就非常繁杂了。因为数据源这个概念太模糊了,我们只知道它包含了很多数据而已,至于这个数据源到底是什么样类型,并没有严格的定义,有可能是数组,也有可能是集合,甚至有可能是数据库表中查询出来的游标。所以说如果ListView真的去为每一种数据源都进行适配操作的话,一是扩展性会比较差,内置了几种适配就只有几种适配,不能动态进行添加。二是超出了它本身应该负责的工作范围,不再是仅仅承担交互和展示工作就可以了,这样ListView就会变得比较臃肿。
那么显然Android开发团队是不会允许这种事情发生的,于是就有了Adapter这样一个机制的出现。顾名思义,Adapter是适配器的意思,它在ListView和数据源之间起到了一个桥梁的作用,ListView并不会直接和数据源打交道,而是会借助Adapter这个桥梁来去访问真正的数据源,与之前不同的是,Adapter的接口都是统一的,因此ListView不用再去担心任何适配方面的问题。而Adapter又是一个接口(interface),它可以去实现各种各样的子类,每个子类都能通过自己的逻辑来去完成特定的功能,以及与特定数据源的适配操作,比如说ArrayAdapter可以用于数组和List类型的数据源适配,SimpleCursorAdapter可以用于游标类型的数据源适配,这样就非常巧妙地把数据源适配困难的问题解决掉了,并且还拥有相当不错的扩展性。简单的原理示意图如下所示:

当然Adapter的作用不仅仅只有数据源适配这一点,还有一个非常非常重要的方法也需要我们在Adapter当中去重写,就是getView()方法,这个在下面的文章中还会详细讲到。
RecycleBin机制
那么在开始分析ListView的源码之前,还有一个东西是我们提前需要了解的,就是RecycleBin机制,这个机制也是ListView能够实现成百上千条数据都不会OOM最重要的一个原因。其实RecycleBin的代码并不多,只有300行左右,它是写在AbsListView中的一个内部类,所以所有继承自AbsListView的子类,也就是ListView和GridView,都可以使用这个机制。那我们来看一下RecycleBin中的主要代码,如下所示:
    /**
     * The RecycleBin facilitates reuse of views across layouts. The RecycleBin
     * has two levels of storage: ActiveViews and ScrapViews. ActiveViews are
     * those views which were onscreen at the start of a layout. By
     * construction, they are displaying current information. At the end of
     * layout, all views in ActiveViews are demoted to ScrapViews. ScrapViews
     * are old views that could potentially be used by the adapter to avoid
     * allocating views unnecessarily.
     *
     * @see android.widget.AbsListView#setRecyclerListener(android.widget.AbsListView.RecyclerListener)
     * @see android.widget.AbsListView.RecyclerListener
     */
    class RecycleBin {
        private RecyclerListener mRecyclerListener;

        /**
         * The position of the first view stored in mActiveViews.
         */
        private int mFirstActivePosition;

        /**
         * Views that were on screen at the start of layout. This array is
         * populated at the start of layout, and at the end of layout all view
         * in mActiveViews are moved to mScrapViews. Views in mActiveViews
         * represent a contiguous range of Views, with position of the first
         * view store in mFirstActivePosition.
         */
        private View[] mActiveViews = new View[0];

        /**
         * Unsorted views that can be used by the adapter as a convert view.
         */
        private ArrayList[] mScrapViews;

        private int mViewTypeCount;

        private ArrayList mCurrentScrap;

        /**
         * Fill ActiveViews with all of the children of the AbsListView.
         *
         * @param childCount
         *            The minimum number of views mActiveViews should hold
         * @param firstActivePosition
         *            The position of the first view that will be stored in
         *            mActiveViews
         */
        void fillActiveViews(int childCount, int firstActivePosition) {
            if (mActiveViews.length < childCount) {
                mActiveViews = new View[childCount];
            }
            mFirstActivePosition = firstActivePosition;
            final View[] activeViews = mActiveViews;
            for (int i = 0; i < childCount; i++) {
                View child = getChildAt(i);
                AbsListView.LayoutParams lp = (AbsListView.LayoutParams) child.getLayoutParams();
                // Don't put header or footer views into the scrap heap
                if (lp != null && lp.viewType != ITEM_VIEW_TYPE_HEADER_OR_FOOTER) {
                    // Note: We do place AdapterView.ITEM_VIEW_TYPE_IGNORE in
                    // active views.
                    // However, we will NOT place them into scrap views.
                    activeViews[i] = child;
                }
            }
        }

        /**
         * Get the view corresponding to the specified position. The view will
         * be removed from mActiveViews if it is found.
         *
         * @param position
         *            The position to look up in mActiveViews
         * @return The view if it is found, null otherwise
         */
        View getActiveView(int position) {
            int index = position - mFirstActivePosition;
            final View[] activeViews = mActiveViews;
            if (index >= 0 && index < activeViews.length) {
                final View match = activeViews[index];
                activeViews[index] = null;
                return match;
            }
            return null;
        }

        /**
         * Put a view into the ScapViews list. These views are unordered.
         *
         * @param scrap
         *            The view to add
         */
        void addScrapView(View scrap) {
            AbsListView.LayoutParams lp = (AbsListView.LayoutParams) scrap.getLayoutParams();
            if (lp == null) {
                return;
            }
            // Don't put header or footer views or views that should be ignored
            // into the scrap heap
            int viewType = lp.viewType;
            if (!shouldRecycleViewType(viewType)) {
                if (viewType != ITEM_VIEW_TYPE_HEADER_OR_FOOTER) {
                    removeDetachedView(scrap, false);
                }
                return;
            }
            if (mViewTypeCount == 1) {
                dispatchFinishTemporaryDetach(scrap);
                mCurrentScrap.add(scrap);
            } else {
                dispatchFinishTemporaryDetach(scrap);
                mScrapViews[viewType].add(scrap);
            }

            if (mRecyclerListener != null) {
                mRecyclerListener.onMovedToScrapHeap(scrap);
            }
        }

        /**
         * @return A view from the ScrapViews collection. These are unordered.
         */
        View getScrapView(int position) {
            ArrayList scrapViews;
            if (mViewTypeCount == 1) {
                scrapViews = mCurrentScrap;
                int size = scrapViews.size();
                if (size > 0) {
                    return scrapViews.remove(size - 1);
                } else {
                    return null;
                }
            } else {
                int whichScrap = mAdapter.getItemViewType(position);
                if (whichScrap >= 0 && whichScrap < mScrapViews.length) {
                    scrapViews = mScrapViews[whichScrap];
                    int size = scrapViews.size();
                    if (size > 0) {
                        return scrapViews.remove(size - 1);
                    }
                }
            }
            return null;
        }

        public void setViewTypeCount(int viewTypeCount) {
            if (viewTypeCount < 1) {
                throw new IllegalArgumentException("Can't have a viewTypeCount < 1");
            }
            // noinspection unchecked
            ArrayList[] scrapViews = new ArrayList[viewTypeCount];
            for (int i = 0; i < viewTypeCount; i++) {
                scrapViews[i] = new ArrayList();
            }
            mViewTypeCount = viewTypeCount;
            mCurrentScrap = scrapViews[0];
            mScrapViews = scrapViews;
        }

    }
这里的RecycleBin代码并不全,我只是把最主要的几个方法提了出来。那么我们先来对这几个方法进行简单解读,这对后面分析ListView的工作原理将会有很大的帮助。
fillActiveViews() 这个方法接收两个参数,第一个参数表示要存储的view的数量,第二个参数表示ListView中第一个可见元素的position值。RecycleBin当中使用mActiveViews这个数组来存储View,调用这个方法后就会根据传入的参数来将ListView中的指定元素存储到mActiveViews数组当中。
getActiveView() 这个方法和fillActiveViews()是对应的,用于从mActiveViews数组当中获取数据。该方法接收一个position参数,表示元素在ListView当中的位置,方法内部会自动将position值转换成mActiveViews数组对应的下标值。需要注意的是,mActiveViews当中所存储的View,一旦被获取了之后就会从mActiveViews当中移除,下次获取同样位置的View将会返回null,也就是说mActiveViews不能被重复利用。
addScrapView() 用于将一个废弃的View进行缓存,该方法接收一个View参数,当有某个View确定要废弃掉的时候(比如滚动出了屏幕),就应该调用这个方法来对View进行缓存,RecycleBin当中使用mScrapViews和mCurrentScrap这两个List来存储废弃View。
getScrapView 用于从废弃缓存中取出一个View,这些废弃缓存中的View是没有顺序可言的,因此getScrapView()方法中的算法也非常简单,就是直接从mCurrentScrap当中获取尾部的一个scrap view进行返回。
setViewTypeCount() 我们都知道Adapter当中可以重写一个getViewTypeCount()来表示ListView中有几种类型的数据项,而setViewTypeCount()方法的作用就是为每种类型的数据项都单独启用一个RecycleBin缓存机制。实际上,getViewTypeCount()方法通常情况下使用的并不是很多,所以我们只要知道RecycleBin当中有这样一个功能就行了。
了解了RecycleBin中的主要方法以及它们的用处之后,下面就可以开始来分析ListView的工作原理了,这里我将还是按照以前分析源码的方式来进行,即跟着主线执行流程来逐步阅读并点到即止,不然的话要是把ListView所有的代码都贴出来,那么本篇文章将会很长很长了。
第一次Layout
不管怎么说,ListView即使再特殊最终还是继承自View的,因此它的执行流程还将会按照View的规则来执行,对于这方面不太熟悉的朋友可以参考我之前写的 Android视图绘制流程完全解析,带你一步步深入了解View(二) 。
View的执行流程无非就分为三步,onMeasure()用于测量View的大小,onLayout()用于确定View的布局,onDraw()用于将View绘制到界面上。而在ListView当中,onMeasure()并没有什么特殊的地方,因为它终归是一个View,占用的空间最多并且通常也就是整个屏幕。onDraw()在ListView当中也没有什么意义,因为ListView本身并不负责绘制,而是由ListView当中的子元素来进行绘制的。那么ListView大部分的神奇功能其实都是在onLayout()方法中进行的了,因此我们本篇文章也是主要分析的这个方法里的内容。
如果你到ListView源码中去找一找,你会发现ListView中是没有onLayout()这个方法的,这是因为这个方法是在ListView的父类AbsListView中实现的,代码如下所示:
    /**
     * Subclasses should NOT override this method but {@link #layoutChildren()}
     * instead.
     */
    @Override
    protected void onLayout(boolean changed, int l, int t, int r, int b) {
        super.onLayout(changed, l, t, r, b);
        mInLayout = true;
        if (changed) {
            int childCount = getChildCount();
            for (int i = 0; i < childCount; i++) {
                getChildAt(i).forceLayout();
            }
            mRecycler.markChildrenDirty();
        }
        layoutChildren();
        mInLayout = false;
    }
可以看到,onLayout()方法中并没有做什么复杂的逻辑操作,主要就是一个判断,如果ListView的大小或者位置发生了变化,那么changed变量就会变成true,此时会要求所有的子布局都强制进行重绘。除此之外倒没有什么难理解的地方了,不过我们注意到,在第16行调用了layoutChildren()这个方法,从方法名上我们就可以猜出这个方法是用来进行子元素布局的,不过进入到这个方法当中你会发现这是个空方法,没有一行代码。这当然是可以理解的了,因为子元素的布局应该是由具体的实现类来负责完成的,而不是由父类完成。那么进入ListView的layoutChildren()方法,代码如下所示:
   @Override
    protected void layoutChildren() {
        final boolean blockLayoutRequests = mBlockLayoutRequests;
        if (!blockLayoutRequests) {
            mBlockLayoutRequests = true;
        } else {
            return;
        }
        try {
            super.layoutChildren();
            invalidate();
            if (mAdapter == null) {
                resetList();
                invokeOnItemScrollListener();
                return;
            }
            int childrenTop = mListPadding.top;
            int childrenBottom = getBottom() - getTop() - mListPadding.bottom;
            int childCount = getChildCount();
            int index = 0;
            int delta = 0;
            View sel;
            View oldSel = null;
            View oldFirst = null;
            View newSel = null;
            View focusLayoutRestoreView = null;
            // Remember stuff we will need down below
            switch (mLayoutMode) {
            case LAYOUT_SET_SELECTION:
                index = mNextSelectedPosition - mFirstPosition;
                if (index >= 0 && index < childCount) {
                    newSel = getChildAt(index);
                }
                break;
            case LAYOUT_FORCE_TOP:
            case LAYOUT_FORCE_BOTTOM:
            case LAYOUT_SPECIFIC:
            case LAYOUT_SYNC:
                break;
            case LAYOUT_MOVE_SELECTION:
            default:
                // Remember the previously selected view
                index = mSelectedPosition - mFirstPosition;
                if (index >= 0 && index < childCount) {
                    oldSel = getChildAt(index);
                }
                // Remember the previous first child
                oldFirst = getChildAt(0);
                if (mNextSelectedPosition >= 0) {
                    delta = mNextSelectedPosition - mSelectedPosition;
                }
                // Caution: newSel might be null
                newSel = getChildAt(index + delta);
            }
            boolean dataChanged = mDataChanged;
            if (dataChanged) {
                handleDataChanged();
            }
            // Handle the empty set by removing all views that are visible
            // and calling it a day
            if (mItemCount == 0) {
                resetList();
                invokeOnItemScrollListener();
                return;
            } else if (mItemCount != mAdapter.getCount()) {
                throw new IllegalStateException("The content of the adapter has changed but "
                        + "ListView did not receive a notification. Make sure the content of "
                        + "your adapter is not modified from a background thread, but only "
                        + "from the UI thread. [in ListView(" + getId() + ", " + getClass()
                        + ") with Adapter(" + mAdapter.getClass() + ")]");
            }
            setSelectedPositionInt(mNextSelectedPosition);
            // Pull all children into the RecycleBin.
            // These views will be reused if possible
            final int firstPosition = mFirstPosition;
            final RecycleBin recycleBin = mRecycler;
            // reset the focus restoration
            View focusLayoutRestoreDirectChild = null;
            // Don't put header or footer views into the Recycler. Those are
            // already cached in mHeaderViews;
            if (dataChanged) {
                for (int i = 0; i < childCount; i++) {
                    recycleBin.addScrapView(getChildAt(i));
                    if (ViewDebug.TRACE_RECYCLER) {
                        ViewDebug.trace(getChildAt(i),
                                ViewDebug.RecyclerTraceType.MOVE_TO_SCRAP_HEAP, index, i);
                    }
                }
            } else {
                recycleBin.fillActiveViews(childCount, firstPosition);
            }
            // take focus back to us temporarily to avoid the eventual
            // call to clear focus when removing the focused child below
            // from messing things up when ViewRoot assigns focus back
            // to someone else
            final View focusedChild = getFocusedChild();
            if (focusedChild != null) {
                // TODO: in some cases focusedChild.getParent() == null
                // we can remember the focused view to restore after relayout if the
                // data hasn't changed, or if the focused position is a header or footer
                if (!dataChanged || isDirectChildHeaderOrFooter(focusedChild)) {
                    focusLayoutRestoreDirectChild = focusedChild;
                    // remember the specific view that had focus
                    focusLayoutRestoreView = findFocus();
                    if (focusLayoutRestoreView != null) {
                        // tell it we are going to mess with it
                        focusLayoutRestoreView.onStartTemporaryDetach();
                    }
                }
                requestFocus();
            }
            // Clear out old views
            detachAllViewsFromParent();
            switch (mLayoutMode) {
            case LAYOUT_SET_SELECTION:
                if (newSel != null) {
                    sel = fillFromSelection(newSel.getTop(), childrenTop, childrenBottom);
                } else {
                    sel = fillFromMiddle(childrenTop, childrenBottom);
                }
                break;
            case LAYOUT_SYNC:
                sel = fillSpecific(mSyncPosition, mSpecificTop);
                break;
            case LAYOUT_FORCE_BOTTOM:
                sel = fillUp(mItemCount - 1, childrenBottom);
                adjustViewsUpOrDown();
                break;
            case LAYOUT_FORCE_TOP:
                mFirstPosition = 0;
                sel = fillFromTop(childrenTop);
                adjustViewsUpOrDown();
                break;
            case LAYOUT_SPECIFIC:
                sel = fillSpecific(reconcileSelectedPosition(), mSpecificTop);
                break;
            case LAYOUT_MOVE_SELECTION:
                sel = moveSelection(oldSel, newSel, delta, childrenTop, childrenBottom);
                break;
            default:
                if (childCount == 0) {
                    if (!mStackFromBottom) {
                        final int position = lookForSelectablePosition(0, true);
                        setSelectedPositionInt(position);
                        sel = fillFromTop(childrenTop);
                    } else {
                        final int position = lookForSelectablePosition(mItemCount - 1, false);
                        setSelectedPositionInt(position);
                        sel = fillUp(mItemCount - 1, childrenBottom);
                    }
                } else {
                    if (mSelectedPosition >= 0 && mSelectedPosition < mItemCount) {
                        sel = fillSpecific(mSelectedPosition,
                                oldSel == null ? childrenTop : oldSel.getTop());
                    } else if (mFirstPosition < mItemCount) {
                        sel = fillSpecific(mFirstPosition,
                                oldFirst == null ? childrenTop : oldFirst.getTop());
                    } else {
                        sel = fillSpecific(0, childrenTop);
                    }
                }
                break;
            }
            // Flush any cached views that did not get reused above
            recycleBin.scrapActiveViews();
            if (sel != null) {
                // the current selected item should get focus if items
                // are focusable
                if (mItemsCanFocus && hasFocus() && !sel.hasFocus()) {
                    final boolean focusWasTaken = (sel == focusLayoutRestoreDirectChild &&
                            focusLayoutRestoreView.requestFocus()) || sel.requestFocus();
                    if (!focusWasTaken) {
                        // selected item didn't take focus, fine, but still want
                        // to make sure something else outside of the selected view
                        // has focus
                        final View focused = getFocusedChild();
                        if (focused != null) {
                            focused.clearFocus();
                        }
                        positionSelector(sel);
                    } else {
                        sel.setSelected(false);
                        mSelectorRect.setEmpty();
                    }
                } else {
                    positionSelector(sel);
                }
                mSelectedTop = sel.getTop();
            } else {
                if (mTouchMode > TOUCH_MODE_DOWN && mTouchMode < TOUCH_MODE_SCROLL) {
                    View child = getChildAt(mMotionPosition - mFirstPosition);
                    if (child != null) positionSelector(child);
                } else {
                    mSelectedTop = 0;
                    mSelectorRect.setEmpty();
                }
                // even if there is not selected position, we may need to restore
                // focus (i.e. something focusable in touch mode)
                if (hasFocus() && focusLayoutRestoreView != null) {
                    focusLayoutRestoreView.requestFocus();
                }
            }
            // tell focus view we are done mucking with it, if it is still in
            // our view hierarchy.
            if (focusLayoutRestoreView != null
                    && focusLayoutRestoreView.getWindowToken() != null) {
                focusLayoutRestoreView.onFinishTemporaryDetach();
            }
            mLayoutMode = LAYOUT_NORMAL;
            mDataChanged = false;
            mNeedSync = false;
            setNextSelectedPositionInt(mSelectedPosition);
            updateScrollIndicators();
            if (mItemCount > 0) {
                checkSelectionChanged();
            }
            invokeOnItemScrollListener();
        } finally {
            if (!blockLayoutRequests) {
                mBlockLayoutRequests = false;
            }
        }
    }
这段代码比较长,我们挑重点的看。首先可以确定的是,ListView当中目前还没有任何子View,数据都还是由Adapter管理的,并没有展示到界面上,因此第19行getChildCount()方法得到的值肯定是0。接着在第81行会根据dataChanged这个布尔型的值来判断执行逻辑,dataChanged只有在数据源发生改变的情况下才会变成true,其它情况都是false,因此这里会进入到第90行的执行逻辑,调用RecycleBin的fillActiveViews()方法。按理来说,调用fillActiveViews()方法是为了将ListView的子View进行缓存的,可是目前ListView中还没有任何的子View,因此这一行暂时还起不了任何作用。
接下来在第114行会根据mLayoutMode的值来决定布局模式,默认情况下都是普通模式LAYOUT_NORMAL,因此会进入到第140行的default语句当中。而下面又会紧接着进行两次if判断,childCount目前是等于0的,并且默认的布局顺序是从上往下,因此会进入到第145行的fillFromTop()方法,我们跟进去瞧一瞧:
    /**
     * Fills the list from top to bottom, starting with mFirstPosition
     *
     * @param nextTop The location where the top of the first item should be
     *        drawn
     *
     * @return The view that is currently selected
     */
    private View fillFromTop(int nextTop) {
        mFirstPosition = Math.min(mFirstPosition, mSelectedPosition);
        mFirstPosition = Math.min(mFirstPosition, mItemCount - 1);
        if (mFirstPosition < 0) {
            mFirstPosition = 0;
        }
        return fillDown(mFirstPosition, nextTop);
    }
从这个方法的注释中可以看出,它所负责的主要任务就是从mFirstPosition开始,自顶至底去填充ListView。而这个方法本身并没有什么逻辑,就是判断了一下mFirstPosition值的合法性,然后调用fillDown()方法,那么我们就有理由可以猜测,填充ListView的操作是在fillDown()方法中完成的。进入fillDown()方法,代码如下所示:
    /**
     * Fills the list from pos down to the end of the list view.
     *
     * @param pos The first position to put in the list
     *
     * @param nextTop The location where the top of the item associated with pos
     *        should be drawn
     *
     * @return The view that is currently selected, if it happens to be in the
     *         range that we draw.
     */
    private View fillDown(int pos, int nextTop) {
        View selectedView = null;
        int end = (getBottom() - getTop()) - mListPadding.bottom;
        while (nextTop < end && pos < mItemCount) {
            // is this the selected item?
            boolean selected = pos == mSelectedPosition;
            View child = makeAndAddView(pos, nextTop, true, mListPadding.left, selected);
            nextTop = child.getBottom() + mDividerHeight;
            if (selected) {
                selectedView = child;
            }
            pos++;
        }
        return selectedView;
    }
可以看到,这里使用了一个while循环来执行重复逻辑,一开始nextTop的值是第一个子元素顶部距离整个ListView顶部的像素值,pos则是刚刚传入的mFirstPosition的值,而end是ListView底部减去顶部所得的像素值,mItemCount则是Adapter中的元素数量。因此一开始的情况下nextTop必定是小于end值的,并且pos也是小于mItemCount值的。那么每执行一次while循环,pos的值都会加1,并且nextTop也会增加,当nextTop大于等于end时,也就是子元素已经超出当前屏幕了,或者pos大于等于mItemCount时,也就是所有Adapter中的元素都被遍历结束了,就会跳出while循环。
那么while循环当中又做了什么事情呢?值得让人留意的就是第18行调用的makeAndAddView()方法,进入到这个方法当中,代码如下所示:
    /**
     * Obtain the view and add it to our list of children. The view can be made
     * fresh, converted from an unused view, or used as is if it was in the
     * recycle bin.
     *
     * @param position Logical position in the list
     * @param y Top or bottom edge of the view to add
     * @param flow If flow is true, align top edge to y. If false, align bottom
     *        edge to y.
     * @param childrenLeft Left edge where children should be positioned
     * @param selected Is this position selected?
     * @return View that was added
     */
    private View makeAndAddView(int position, int y, boolean flow, int childrenLeft,
            boolean selected) {
        View child;
        if (!mDataChanged) {
            // Try to use an exsiting view for this position
            child = mRecycler.getActiveView(position);
            if (child != null) {
                // Found it -- we're using an existing child
                // This just needs to be positioned
                setupChild(child, position, y, flow, childrenLeft, selected, true);
                return child;
            }
        }
        // Make a new view for this position, or convert an unused view if possible
        child = obtainView(position, mIsScrap);
        // This needs to be positioned and measured
        setupChild(child, position, y, flow, childrenLeft, selected, mIsScrap[0]);
        return child;
    }
这里在第19行尝试从RecycleBin当中快速获取一个active view,不过很遗憾的是目前RecycleBin当中还没有缓存任何的View,所以这里得到的值肯定是null。那么取得了null之后就会继续向下运行,到第28行会调用obtainView()方法来再次尝试获取一个View,这次的obtainView()方法是可以保证一定返回一个View的,于是下面立刻将获取到的View传入到了setupChild()方法当中。那么obtainView()内部到底是怎么工作的呢?我们先进入到这个方法里面看一下:
    /**
     * Get a view and have it show the data associated with the specified
     * position. This is called when we have already discovered that the view is
     * not available for reuse in the recycle bin. The only choices left are
     * converting an old view or making a new one.
     *
     * @param position
     *            The position to display
     * @param isScrap
     *            Array of at least 1 boolean, the first entry will become true
     *            if the returned view was taken from the scrap heap, false if
     *            otherwise.
     *
     * @return A view displaying the data associated with the specified position
     */
    View obtainView(int position, boolean[] isScrap) {
        isScrap[0] = false;
        View scrapView;
        scrapView = mRecycler.getScrapView(position);
        View child;
        if (scrapView != null) {
            child = mAdapter.getView(position, scrapView, this);
            if (child != scrapView) {
                mRecycler.addScrapView(scrapView);
                if (mCacheColorHint != 0) {
                    child.setDrawingCacheBackgroundColor(mCacheColorHint);
                }
            } else {
                isScrap[0] = true;
                dispatchFinishTemporaryDetach(child);
            }
        } else {
            child = mAdapter.getView(position, null, this);
            if (mCacheColorHint != 0) {
                child.setDrawingCacheBackgroundColor(mCacheColorHint);
            }
        }
        return child;
    }
obtainView()方法中的代码并不多,但却包含了非常非常重要的逻辑,不夸张的说,整个ListView中最重要的内容可能就在这个方法里了。那么我们还是按照执行流程来看,在第19行代码中调用了RecycleBin的getScrapView()方法来尝试获取一个废弃缓存中的View,同样的道理,这里肯定是获取不到的,getScrapView()方法会返回一个null。这时该怎么办呢?没有关系,代码会执行到第33行,调用mAdapter的getView()方法来去获取一个View。那么mAdapter是什么呢?当然就是当前ListView关联的适配器了。而getView()方法又是什么呢?还用说吗,这个就是我们平时使用ListView时最最经常重写的一个方法了,这里getView()方法中传入了三个参数,分别是position,null和this。
那么我们平时写ListView的Adapter时,getView()方法通常会怎么写呢?这里我举个简单的例子:
   @Override
    public View getView(int position, View convertView, ViewGroup parent) {
        Fruit fruit = getItem(position);
        View view;
        if (convertView == null) {
            view = LayoutInflater.from(getContext()).inflate(resourceId, null);
        } else {
            view = convertView;
        }
        ImageView fruitImage = (ImageView) view.findViewById(R.id.fruit_image);
        TextView fruitName = (TextView) view.findViewById(R.id.fruit_name);
        fruitImage.setImageResource(fruit.getImageId());
        fruitName.setText(fruit.getName());
        return view;
    }
getView()方法接受的三个参数,第一个参数position代表当前子元素的的位置,我们可以通过具体的位置来获取与其相关的数据。第二个参数convertView,刚才传入的是null,说明没有convertView可以利用,因此我们会调用LayoutInflater的inflate()方法来去加载一个布局。接下来会对这个view进行一些属性和值的设定,最后将view返回。
那么这个View也会作为obtainView()的结果进行返回,并最终传入到setupChild()方法当中。其实也就是说,第一次layout过程当中,所有的子View都是调用LayoutInflater的inflate()方法加载出来的,这样就会相对比较耗时,但是不用担心,后面就不会再有这种情况了,那么我们继续往下看:
    /**
     * Add a view as a child and make sure it is measured (if necessary) and
     * positioned properly.
     *
     * @param child The view to add
     * @param position The position of this child
     * @param y The y position relative to which this view will be positioned
     * @param flowDown If true, align top edge to y. If false, align bottom
     *        edge to y.
     * @param childrenLeft Left edge where children should be positioned
     * @param selected Is this position selected?
     * @param recycled Has this view been pulled from the recycle bin? If so it
     *        does not need to be remeasured.
     */
    private void setupChild(View child, int position, int y, boolean flowDown, int childrenLeft,
            boolean selected, boolean recycled) {
        final boolean isSelected = selected && shouldShowSelector();
        final boolean updateChildSelected = isSelected != child.isSelected();
        final int mode = mTouchMode;
        final boolean isPressed = mode > TOUCH_MODE_DOWN && mode < TOUCH_MODE_SCROLL &&
                mMotionPosition == position;
        final boolean updateChildPressed = isPressed != child.isPressed();
        final boolean needToMeasure = !recycled || updateChildSelected || child.isLayoutRequested();
        // Respect layout params that are already in the view. Otherwise make some up...
        // noinspection unchecked
        AbsListView.LayoutParams p = (AbsListView.LayoutParams) child.getLayoutParams();
        if (p == null) {
            p = new AbsListView.LayoutParams(ViewGroup.LayoutParams.MATCH_PARENT,
                    ViewGroup.LayoutParams.WRAP_CONTENT, 0);
        }
        p.viewType = mAdapter.getItemViewType(position);
        if ((recycled && !p.forceAdd) || (p.recycledHeaderFooter &&
                p.viewType == AdapterView.ITEM_VIEW_TYPE_HEADER_OR_FOOTER)) {
            attachViewToParent(child, flowDown ? -1 : 0, p);
        } else {
            p.forceAdd = false;
            if (p.viewType == AdapterView.ITEM_VIEW_TYPE_HEADER_OR_FOOTER) {
                p.recycledHeaderFooter = true;
            }
            addViewInLayout(child, flowDown ? -1 : 0, p, true);
        }
        if (updateChildSelected) {
            child.setSelected(isSelected);
        }
        if (updateChildPressed) {
            child.setPressed(isPressed);
        }
        if (needToMeasure) {
            int childWidthSpec = ViewGroup.getChildMeasureSpec(mWidthMeasureSpec,
                    mListPadding.left + mListPadding.right, p.width);
            int lpHeight = p.height;
            int childHeightSpec;
            if (lpHeight > 0) {
                childHeightSpec = MeasureSpec.makeMeasureSpec(lpHeight, MeasureSpec.EXACTLY);
            } else {
                childHeightSpec = MeasureSpec.makeMeasureSpec(0, MeasureSpec.UNSPECIFIED);
            }
            child.measure(childWidthSpec, childHeightSpec);
        } else {
            cleanupLayoutState(child);
        }
        final int w = child.getMeasuredWidth();
        final int h = child.getMeasuredHeight();
        final int childTop = flowDown ? y : y - h;
        if (needToMeasure) {
            final int childRight = childrenLeft + w;
            final int childBottom = childTop + h;
            child.layout(childrenLeft, childTop, childRight, childBottom);
        } else {
            child.offsetLeftAndRight(childrenLeft - child.getLeft());
            child.offsetTopAndBottom(childTop - child.getTop());
        }
        if (mCachingStarted && !child.isDrawingCacheEnabled()) {
            child.setDrawingCacheEnabled(true);
        }
    }
setupChild()方法当中的代码虽然比较多,但是我们只看核心代码的话就非常简单了,刚才调用obtainView()方法获取到的子元素View,这里在第40行调用了addViewInLayout()方法将它添加到了ListView当中。那么根据fillDown()方法中的while循环,会让子元素View将整个ListView控件填满然后就跳出,也就是说即使我们的Adapter中有一千条数据,ListView也只会加载第一屏的数据,剩下的数据反正目前在屏幕上也看不到,所以不会去做多余的加载工作,这样就可以保证ListView中的内容能够迅速展示到屏幕上。
那么到此为止,第一次Layout过程结束。
第二次Layout
虽然我在源码中并没有找出具体的原因,但如果你自己做一下实验的话就会发现,即使是一个再简单的View,在展示到界面上之前都会经历至少两次onMeasure()和两次onLayout()的过程。其实这只是一个很小的细节,平时对我们影响并不大,因为不管是onMeasure()或者onLayout()几次,反正都是执行的相同的逻辑,我们并不需要进行过多关心。但是在ListView中情况就不一样了,因为这就意味着layoutChildren()过程会执行两次,而这个过程当中涉及到向ListView中添加子元素,如果相同的逻辑执行两遍的话,那么ListView中就会存在一份重复的数据了。因此ListView在layoutChildren()过程当中做了第二次Layout的逻辑处理,非常巧妙地解决了这个问题,下面我们就来分析一下第二次Layout的过程。
其实第二次Layout和第一次Layout的基本流程是差不多的,那么我们还是从layoutChildren()方法开始看起:
    @Override
    protected void layoutChildren() {
        final boolean blockLayoutRequests = mBlockLayoutRequests;
        if (!blockLayoutRequests) {
            mBlockLayoutRequests = true;
        } else {
            return;
        }
        try {
            super.layoutChildren();
            invalidate();
            if (mAdapter == null) {
                resetList();
                invokeOnItemScrollListener();
                return;
            }
            int childrenTop = mListPadding.top;
            int childrenBottom = getBottom() - getTop() - mListPadding.bottom;
            int childCount = getChildCount();
            int index = 0;
            int delta = 0;
            View sel;
            View oldSel = null;
            View oldFirst = null;
            View newSel = null;
            View focusLayoutRestoreView = null;
            // Remember stuff we will need down below
            switch (mLayoutMode) {
            case LAYOUT_SET_SELECTION:
                index = mNextSelectedPosition - mFirstPosition;
                if (index >= 0 && index < childCount) {
                    newSel = getChildAt(index);
                }
                break;
            case LAYOUT_FORCE_TOP:
            case LAYOUT_FORCE_BOTTOM:
            case LAYOUT_SPECIFIC:
            case LAYOUT_SYNC:
                break;
            case LAYOUT_MOVE_SELECTION:
            default:
                // Remember the previously selected view
                index = mSelectedPosition - mFirstPosition;
                if (index >= 0 && index < childCount) {
                    oldSel = getChildAt(index);
                }
                // Remember the previous first child
                oldFirst = getChildAt(0);
                if (mNextSelectedPosition >= 0) {
                    delta = mNextSelectedPosition - mSelectedPosition;
                }
                // Caution: newSel might be null
                newSel = getChildAt(index + delta);
            }
            boolean dataChanged = mDataChanged;
            if (dataChanged) {
                handleDataChanged();
            }
            // Handle the empty set by removing all views that are visible
            // and calling it a day
            if (mItemCount == 0) {
                resetList();
                invokeOnItemScrollListener();
                return;
            } else if (mItemCount != mAdapter.getCount()) {
                throw new IllegalStateException("The content of the adapter has changed but "
                        + "ListView did not receive a notification. Make sure the content of "
                        + "your adapter is not modified from a background thread, but only "
                        + "from the UI thread. [in ListView(" + getId() + ", " + getClass()
                        + ") with Adapter(" + mAdapter.getClass() + ")]");
            }
            setSelectedPositionInt(mNextSelectedPosition);
            // Pull all children into the RecycleBin.
            // These views will be reused if possible
            final int firstPosition = mFirstPosition;
            final RecycleBin recycleBin = mRecycler;
            // reset the focus restoration
            View focusLayoutRestoreDirectChild = null;
            // Don't put header or footer views into the Recycler. Those are
            // already cached in mHeaderViews;
            if (dataChanged) {
                for (int i = 0; i < childCount; i++) {
                    recycleBin.addScrapView(getChildAt(i));
                    if (ViewDebug.TRACE_RECYCLER) {
                        ViewDebug.trace(getChildAt(i),
                                ViewDebug.RecyclerTraceType.MOVE_TO_SCRAP_HEAP, index, i);
                    }
                }
            } else {
                recycleBin.fillActiveViews(childCount, firstPosition);
            }
            // take focus back to us temporarily to avoid the eventual
            // call to clear focus when removing the focused child below
            // from messing things up when ViewRoot assigns focus back
            // to someone else
            final View focusedChild = getFocusedChild();
            if (focusedChild != null) {
                // TODO: in some cases focusedChild.getParent() == null
                // we can remember the focused view to restore after relayout if the
                // data hasn't changed, or if the focused position is a header or footer
                if (!dataChanged || isDirectChildHeaderOrFooter(focusedChild)) {
                    focusLayoutRestoreDirectChild = focusedChild;
                    // remember the specific view that had focus
                    focusLayoutRestoreView = findFocus();
                    if (focusLayoutRestoreView != null) {
                        // tell it we are going to mess with it
                        focusLayoutRestoreView.onStartTemporaryDetach();
                    }
                }
                requestFocus();
            }
            // Clear out old views
            detachAllViewsFromParent();
            switch (mLayoutMode) {
            case LAYOUT_SET_SELECTION:
                if (newSel != null) {
                    sel = fillFromSelection(newSel.getTop(), childrenTop, childrenBottom);
                } else {
                    sel = fillFromMiddle(childrenTop, childrenBottom);
                }
                break;
            case LAYOUT_SYNC:
                sel = fillSpecific(mSyncPosition, mSpecificTop);
                break;
            case LAYOUT_FORCE_BOTTOM:
                sel = fillUp(mItemCount - 1, childrenBottom);
                adjustViewsUpOrDown();
                break;
            case LAYOUT_FORCE_TOP:
                mFirstPosition = 0;
                sel = fillFromTop(childrenTop);
                adjustViewsUpOrDown();
                break;
            case LAYOUT_SPECIFIC:
                sel = fillSpecific(reconcileSelectedPosition(), mSpecificTop);
                break;
            case LAYOUT_MOVE_SELECTION:
                sel = moveSelection(oldSel, newSel, delta, childrenTop, childrenBottom);
                break;
            default:
                if (childCount == 0) {
                    if (!mStackFromBottom) {
                        final int position = lookForSelectablePosition(0, true);
                        setSelectedPositionInt(position);
                        sel = fillFromTop(childrenTop);
                    } else {
                        final int position = lookForSelectablePosition(mItemCount - 1, false);
                        setSelectedPositionInt(position);
                        sel = fillUp(mItemCount - 1, childrenBottom);
                    }
                } else {
                    if (mSelectedPosition >= 0 && mSelectedPosition < mItemCount) {
                        sel = fillSpecific(mSelectedPosition,
                                oldSel == null ? childrenTop : oldSel.getTop());
                    } else if (mFirstPosition < mItemCount) {
                        sel = fillSpecific(mFirstPosition,
                                oldFirst == null ? childrenTop : oldFirst.getTop());
                    } else {
                        sel = fillSpecific(0, childrenTop);
                    }
                }
                break;
            }
            // Flush any cached views that did not get reused above
            recycleBin.scrapActiveViews();
            if (sel != null) {
                // the current selected item should get focus if items
                // are focusable
                if (mItemsCanFocus && hasFocus() && !sel.hasFocus()) {
                    final boolean focusWasTaken = (sel == focusLayoutRestoreDirectChild &&
                            focusLayoutRestoreView.requestFocus()) || sel.requestFocus();
                    if (!focusWasTaken) {
                        // selected item didn't take focus, fine, but still want
                        // to make sure something else outside of the selected view
                        // has focus
                        final View focused = getFocusedChild();
                        if (focused != null) {
                            focused.clearFocus();
                        }
                        positionSelector(sel);
                    } else {
                        sel.setSelected(false);
                        mSelectorRect.setEmpty();
                    }
                } else {
                    positionSelector(sel);
                }
                mSelectedTop = sel.getTop();
            } else {
                if (mTouchMode > TOUCH_MODE_DOWN && mTouchMode < TOUCH_MODE_SCROLL) {
                    View child = getChildAt(mMotionPosition - mFirstPosition);
                    if (child != null) positionSelector(child);
                } else {
                    mSelectedTop = 0;
                    mSelectorRect.setEmpty();
                }
                // even if there is not selected position, we may need to restore
                // focus (i.e. something focusable in touch mode)
                if (hasFocus() && focusLayoutRestoreView != null) {
                    focusLayoutRestoreView.requestFocus();
                }
            }
            // tell focus view we are done mucking with it, if it is still in
            // our view hierarchy.
            if (focusLayoutRestoreView != null
                    && focusLayoutRestoreView.getWindowToken() != null) {
                focusLayoutRestoreView.onFinishTemporaryDetach();
            }
            mLayoutMode = LAYOUT_NORMAL;
            mDataChanged = false;
            mNeedSync = false;
            setNextSelectedPositionInt(mSelectedPosition);
            updateScrollIndicators();
            if (mItemCount > 0) {
                checkSelectionChanged();
            }
            invokeOnItemScrollListener();
        } finally {
            if (!blockLayoutRequests) {
                mBlockLayoutRequests = false;
            }
        }
    }
同样还是在第19行,调用getChildCount()方法来获取子View的数量,只不过现在得到的值不会再是0了,而是ListView中一屏可以显示的子View数量,因为我们刚刚在第一次Layout过程当中向ListView添加了这么多的子View。下面在第90行调用了RecycleBin的fillActiveViews()方法,这次效果可就不一样了,因为目前ListView中已经有子View了,这样所有的子View都会被缓存到RecycleBin的mActiveViews数组当中,后面将会用到它们。
接下来将会是非常非常重要的一个操作,在第113行调用了detachAllViewsFromParent()方法。这个方法会将所有ListView当中的子View全部清除掉,从而保证第二次Layout过程不会产生一份重复的数据。那有的朋友可能会问了,这样把已经加载好的View又清除掉,待会还要再重新加载一遍,这不是严重影响效率吗?不用担心,还记得我们刚刚调用了RecycleBin的fillActiveViews()方法来缓存子View吗,待会儿将会直接使用这些缓存好的View来进行加载,而并不会重新执行一遍inflate过程,因此效率方面并不会有什么明显的影响。
那么我们接着看,在第141行的判断逻辑当中,由于不再等于0了,因此会进入到else语句当中。而else语句中又有三个逻辑判断,第一个逻辑判断不成立,因为默认情况下我们没有选中任何子元素,mSelectedPosition应该等于-1。第二个逻辑判断通常是成立的,因为mFirstPosition的值一开始是等于0的,只要adapter中的数据大于0条件就成立。那么进入到fillSpecific()方法当中,代码如下所示:
   /**
     * Put a specific item at a specific location on the screen and then build
     * up and down from there.
     *
     * @param position The reference view to use as the starting point
     * @param top Pixel offset from the top of this view to the top of the
     *        reference view.
     *
     * @return The selected view, or null if the selected view is outside the
     *         visible area.
     */
    private View fillSpecific(int position, int top) {
        boolean tempIsSelected = position == mSelectedPosition;
        View temp = makeAndAddView(position, top, true, mListPadding.left, tempIsSelected);
        // Possibly changed again in fillUp if we add rows above this one.
        mFirstPosition = position;
        View above;
        View below;
        final int dividerHeight = mDividerHeight;
        if (!mStackFromBottom) {
            above = fillUp(position - 1, temp.getTop() - dividerHeight);
            // This will correct for the top of the first view not touching the top of the list
            adjustViewsUpOrDown();
            below = fillDown(position + 1, temp.getBottom() + dividerHeight);
            int childCount = getChildCount();
            if (childCount > 0) {
                correctTooHigh(childCount);
            }
        } else {
            below = fillDown(position + 1, temp.getBottom() + dividerHeight);
            // This will correct for the bottom of the last view not touching the bottom of the list
            adjustViewsUpOrDown();
            above = fillUp(position - 1, temp.getTop() - dividerHeight);
            int childCount = getChildCount();
            if (childCount > 0) {
                 correctTooLow(childCount);
            }
        }
        if (tempIsSelected) {
            return temp;
        } else if (above != null) {
            return above;
        } else {
            return below;
        }
    }
fillSpecific()这算是一个新方法了,不过其实它和fillUp()、fillDown()方法功能也是差不多的,主要的区别在于,fillSpecific()方法会优先将指定位置的子View先加载到屏幕上,然后再加载该子View往上以及往下的其它子View。那么由于这里我们传入的position就是第一个子View的位置,于是fillSpecific()方法的作用就基本上和fillDown()方法是差不多的了,这里我们就不去关注太多它的细节,而是将精力放在makeAndAddView()方法上面。再次回到makeAndAddView()方法,代码如下所示:
   /**
     * Obtain the view and add it to our list of children. The view can be made
     * fresh, converted from an unused view, or used as is if it was in the
     * recycle bin.
     *
     * @param position Logical position in the list
     * @param y Top or bottom edge of the view to add
     * @param flow If flow is true, align top edge to y. If false, align bottom
     *        edge to y.
     * @param childrenLeft Left edge where children should be positioned
     * @param selected Is this position selected?
     * @return View that was added
     */
    private View makeAndAddView(int position, int y, boolean flow, int childrenLeft,
            boolean selected) {
        View child;
        if (!mDataChanged) {
            // Try to use an exsiting view for this position
            child = mRecycler.getActiveView(position);
            if (child != null) {
                // Found it -- we're using an existing child
                // This just needs to be positioned
                setupChild(child, position, y, flow, childrenLeft, selected, true);
                return child;
            }
        }
        // Make a new view for this position, or convert an unused view if possible
        child = obtainView(position, mIsScrap);
        // This needs to be positioned and measured
        setupChild(child, position, y, flow, childrenLeft, selected, mIsScrap[0]);
        return child;
    }
仍然还是在第19行尝试从RecycleBin当中获取Active View,然而这次就一定可以获取到了,因为前面我们调用了RecycleBin的fillActiveViews()方法来缓存子View。那么既然如此,就不会再进入到第28行的obtainView()方法,而是会直接进入setupChild()方法当中,这样也省去了很多时间,因为如果在obtainView()方法中又要去infalte布局的话,那么ListView的初始加载效率就大大降低了。
注意在第23行,setupChild()方法的最后一个参数传入的是true,这个参数表明当前的View是之前被回收过的,那么我们再次回到setupChild()方法当中:
    /**
     * Add a view as a child and make sure it is measured (if necessary) and
     * positioned properly.
     *
     * @param child The view to add
     * @param position The position of this child
     * @param y The y position relative to which this view will be positioned
     * @param flowDown If true, align top edge to y. If false, align bottom
     *        edge to y.
     * @param childrenLeft Left edge where children should be positioned
     * @param selected Is this position selected?
     * @param recycled Has this view been pulled from the recycle bin? If so it
     *        does not need to be remeasured.
     */
    private void setupChild(View child, int position, int y, boolean flowDown, int childrenLeft,
            boolean selected, boolean recycled) {
        final boolean isSelected = selected && shouldShowSelector();
        final boolean updateChildSelected = isSelected != child.isSelected();
        final int mode = mTouchMode;
        final boolean isPressed = mode > TOUCH_MODE_DOWN && mode < TOUCH_MODE_SCROLL &&
                mMotionPosition == position;
        final boolean updateChildPressed = isPressed != child.isPressed();
        final boolean needToMeasure = !recycled || updateChildSelected || child.isLayoutRequested();
        // Respect layout params that are already in the view. Otherwise make some up...
        // noinspection unchecked
        AbsListView.LayoutParams p = (AbsListView.LayoutParams) child.getLayoutParams();
        if (p == null) {
            p = new AbsListView.LayoutParams(ViewGroup.LayoutParams.MATCH_PARENT,
                    ViewGroup.LayoutParams.WRAP_CONTENT, 0);
        }
        p.viewType = mAdapter.getItemViewType(position);
        if ((recycled && !p.forceAdd) || (p.recycledHeaderFooter &&
                p.viewType == AdapterView.ITEM_VIEW_TYPE_HEADER_OR_FOOTER)) {
            attachViewToParent(child, flowDown ? -1 : 0, p);
        } else {
            p.forceAdd = false;
            if (p.viewType == AdapterView.ITEM_VIEW_TYPE_HEADER_OR_FOOTER) {
                p.recycledHeaderFooter = true;
            }
            addViewInLayout(child, flowDown ? -1 : 0, p, true);
        }
        if (updateChildSelected) {
            child.setSelected(isSelected);
        }
        if (updateChildPressed) {
            child.setPressed(isPressed);
        }
        if (needToMeasure) {
            int childWidthSpec = ViewGroup.getChildMeasureSpec(mWidthMeasureSpec,
                    mListPadding.left + mListPadding.right, p.width);
            int lpHeight = p.height;
            int childHeightSpec;
            if (lpHeight > 0) {
                childHeightSpec = MeasureSpec.makeMeasureSpec(lpHeight, MeasureSpec.EXACTLY);
            } else {
                childHeightSpec = MeasureSpec.makeMeasureSpec(0, MeasureSpec.UNSPECIFIED);
            }
            child.measure(childWidthSpec, childHeightSpec);
        } else {
            cleanupLayoutState(child);
        }
        final int w = child.getMeasuredWidth();
        final int h = child.getMeasuredHeight();
        final int childTop = flowDown ? y : y - h;
        if (needToMeasure) {
            final int childRight = childrenLeft + w;
            final int childBottom = childTop + h;
            child.layout(childrenLeft, childTop, childRight, childBottom);
        } else {
            child.offsetLeftAndRight(childrenLeft - child.getLeft());
            child.offsetTopAndBottom(childTop - child.getTop());
        }
        if (mCachingStarted && !child.isDrawingCacheEnabled()) {
            child.setDrawingCacheEnabled(true);
        }
    }
可以看到,setupChild()方法的最后一个参数是recycled,然后在第32行会对这个变量进行判断,由于recycled现在是true,所以会执行attachViewToParent()方法,而第一次Layout过程则是执行的else语句中的addViewInLayout()方法。这两个方法最大的区别在于,如果我们需要向ViewGroup中添加一个新的子View,应该调用addViewInLayout()方法,而如果是想要将一个之前detach的View重新attach到ViewGroup上,就应该调用attachViewToParent()方法。那么由于前面在layoutChildren()方法当中调用了detachAllViewsFromParent()方法,这样ListView中所有的子View都是处于detach状态的,所以这里attachViewToParent()方法是正确的选择。
经历了这样一个detach又attach的过程,ListView中所有的子View又都可以正常显示出来了,那么第二次Layout过程结束。
滑动加载更多数据
经历了两次Layout过程,虽说我们已经可以在ListView中看到内容了,然而关于ListView最神奇的部分我们却还没有接触到,因为目前ListView中只是加载并显示了第一屏的数据而已。比如说我们的Adapter当中有1000条数据,但是第一屏只显示了10条,ListView中也只有10个子View而已,那么剩下的990是怎样工作并显示到界面上的呢?这就要看一下ListView滑动部分的源码了,因为我们是通过手指滑动来显示更多数据的。
由于滑动部分的机制是属于通用型的,即ListView和GridView都会使用同样的机制,因此这部分代码就肯定是写在AbsListView当中的了。那么监听触控事件是在onTouchEvent()方法当中进行的,我们就来看一下AbsListView中的这个方法:
    @Override
    public boolean onTouchEvent(MotionEvent ev) {
        if (!isEnabled()) {
            // A disabled view that is clickable still consumes the touch
            // events, it just doesn't respond to them.
            return isClickable() || isLongClickable();
        }
        final int action = ev.getAction();
        View v;
        int deltaY;
        if (mVelocityTracker == null) {
            mVelocityTracker = VelocityTracker.obtain();
        }
        mVelocityTracker.addMovement(ev);
        switch (action & MotionEvent.ACTION_MASK) {
        case MotionEvent.ACTION_DOWN: {
            mActivePointerId = ev.getPointerId(0);
            final int x = (int) ev.getX();
            final int y = (int) ev.getY();
            int motionPosition = pointToPosition(x, y);
            if (!mDataChanged) {
                if ((mTouchMode != TOUCH_MODE_FLING) && (motionPosition >= 0)
                        && (getAdapter().isEnabled(motionPosition))) {
                    // User clicked on an actual view (and was not stopping a
                    // fling). It might be a
                    // click or a scroll. Assume it is a click until proven
                    // otherwise
                    mTouchMode = TOUCH_MODE_DOWN;
                    // FIXME Debounce
                    if (mPendingCheckForTap == null) {
                        mPendingCheckForTap = new CheckForTap();
                    }
                    postDelayed(mPendingCheckForTap, ViewConfiguration.getTapTimeout());
                } else {
                    if (ev.getEdgeFlags() != 0 && motionPosition < 0) {
                        // If we couldn't find a view to click on, but the down
                        // event was touching
                        // the edge, we will bail out and try again. This allows
                        // the edge correcting
                        // code in ViewRoot to try to find a nearby view to
                        // select
                        return false;
                    }

                    if (mTouchMode == TOUCH_MODE_FLING) {
                        // Stopped a fling. It is a scroll.
                        createScrollingCache();
                        mTouchMode = TOUCH_MODE_SCROLL;
                        mMotionCorrection = 0;
                        motionPosition = findMotionRow(y);
                        reportScrollStateChange(OnScrollListener.SCROLL_STATE_TOUCH_SCROLL);
                    }
                }
            }
            if (motionPosition >= 0) {
                // Remember where the motion event started
                v = getChildAt(motionPosition - mFirstPosition);
                mMotionViewOriginalTop = v.getTop();
            }
            mMotionX = x;
            mMotionY = y;
            mMotionPosition = motionPosition;
            mLastY = Integer.MIN_VALUE;
            break;
        }
        case MotionEvent.ACTION_MOVE: {
            final int pointerIndex = ev.findPointerIndex(mActivePointerId);
            final int y = (int) ev.getY(pointerIndex);
            deltaY = y - mMotionY;
            switch (mTouchMode) {
            case TOUCH_MODE_DOWN:
            case TOUCH_MODE_TAP:
            case TOUCH_MODE_DONE_WAITING:
                // Check if we have moved far enough that it looks more like a
                // scroll than a tap
                startScrollIfNeeded(deltaY);
                break;
            case TOUCH_MODE_SCROLL:
                if (PROFILE_SCROLLING) {
                    if (!mScrollProfilingStarted) {
                        Debug.startMethodTracing("AbsListViewScroll");
                        mScrollProfilingStarted = true;
                    }
                }
                if (y != mLastY) {
                    deltaY -= mMotionCorrection;
                    int incrementalDeltaY = mLastY != Integer.MIN_VALUE ? y - mLastY : deltaY;
                    // No need to do all this work if we're not going to move
                    // anyway
                    boolean atEdge = false;
                    if (incrementalDeltaY != 0) {
                        atEdge = trackMotionScroll(deltaY, incrementalDeltaY);
                    }
                    // Check to see if we have bumped into the scroll limit
                    if (atEdge && getChildCount() > 0) {
                        // Treat this like we're starting a new scroll from the
                        // current
                        // position. This will let the user start scrolling back
                        // into
                        // content immediately rather than needing to scroll
                        // back to the
                        // point where they hit the limit first.
                        int motionPosition = findMotionRow(y);
                        if (motionPosition >= 0) {
                            final View motionView = getChildAt(motionPosition - mFirstPosition);
                            mMotionViewOriginalTop = motionView.getTop();
                        }
                        mMotionY = y;
                        mMotionPosition = motionPosition;
                        invalidate();
                    }
                    mLastY = y;
                }
                break;
            }
            break;
        }
        case MotionEvent.ACTION_UP: {
            switch (mTouchMode) {
            case TOUCH_MODE_DOWN:
            case TOUCH_MODE_TAP:
            case TOUCH_MODE_DONE_WAITING:
                final int motionPosition = mMotionPosition;
                final View child = getChildAt(motionPosition - mFirstPosition);
                if (child != null && !child.hasFocusable()) {
                    if (mTouchMode != TOUCH_MODE_DOWN) {
                        child.setPressed(false);
                    }
                    if (mPerformClick == null) {
                        mPerformClick = new PerformClick();
                    }
                    final AbsListView.PerformClick performClick = mPerformClick;
                    performClick.mChild = child;
                    performClick.mClickMotionPosition = motionPosition;
                    performClick.rememberWindowAttachCount();
                    mResurrectToPosition = motionPosition;
                    if (mTouchMode == TOUCH_MODE_DOWN || mTouchMode == TOUCH_MODE_TAP) {
                        final Handler handler = getHandler();
                        if (handler != null) {
                            handler.removeCallbacks(mTouchMode == TOUCH_MODE_DOWN ? mPendingCheckForTap
                                    : mPendingCheckForLongPress);
                        }
                        mLayoutMode = LAYOUT_NORMAL;
                        if (!mDataChanged && mAdapter.isEnabled(motionPosition)) {
                            mTouchMode = TOUCH_MODE_TAP;
                            setSelectedPositionInt(mMotionPosition);
                            layoutChildren();
                            child.setPressed(true);
                            positionSelector(child);
                            setPressed(true);
                            if (mSelector != null) {
                                Drawable d = mSelector.getCurrent();
                                if (d != null && d instanceof TransitionDrawable) {
                                    ((TransitionDrawable) d).resetTransition();
                                }
                            }
                            postDelayed(new Runnable() {
                                public void run() {
                                    child.setPressed(false);
                                    setPressed(false);
                                    if (!mDataChanged) {
                                        post(performClick);
                                    }
                                    mTouchMode = TOUCH_MODE_REST;
                                }
                            }, ViewConfiguration.getPressedStateDuration());
                        } else {
                            mTouchMode = TOUCH_MODE_REST;
                        }
                        return true;
                    } else if (!mDataChanged && mAdapter.isEnabled(motionPosition)) {
                        post(performClick);
                    }
                }
                mTouchMode = TOUCH_MODE_REST;
                break;
            case TOUCH_MODE_SCROLL:
                final int childCount = getChildCount();
                if (childCount > 0) {
                    if (mFirstPosition == 0
                            && getChildAt(0).getTop() >= mListPadding.top
                            && mFirstPosition + childCount < mItemCount
                            && getChildAt(childCount - 1).getBottom()  mMinimumVelocity) {
                            if (mFlingRunnable == null) {
                                mFlingRunnable = new FlingRunnable();
                            }
                            reportScrollStateChange(OnScrollListener.SCROLL_STATE_FLING);
                            mFlingRunnable.start(-initialVelocity);
                        } else {
                            mTouchMode = TOUCH_MODE_REST;
                            reportScrollStateChange(OnScrollListener.SCROLL_STATE_IDLE);
                        }
                    }
                } else {
                    mTouchMode = TOUCH_MODE_REST;
                    reportScrollStateChange(OnScrollListener.SCROLL_STATE_IDLE);
                }
                break;
            }
            setPressed(false);
            // Need to redraw since we probably aren't drawing the selector
            // anymore
            invalidate();
            final Handler handler = getHandler();
            if (handler != null) {
                handler.removeCallbacks(mPendingCheckForLongPress);
            }
            if (mVelocityTracker != null) {
                mVelocityTracker.recycle();
                mVelocityTracker = null;
            }
            mActivePointerId = INVALID_POINTER;
            if (PROFILE_SCROLLING) {
                if (mScrollProfilingStarted) {
                    Debug.stopMethodTracing();
                    mScrollProfilingStarted = false;
                }
            }
            break;
        }
        case MotionEvent.ACTION_CANCEL: {
            mTouchMode = TOUCH_MODE_REST;
            setPressed(false);
            View motionView = this.getChildAt(mMotionPosition - mFirstPosition);
            if (motionView != null) {
                motionView.setPressed(false);
            }
            clearScrollingCache();
            final Handler handler = getHandler();
            if (handler != null) {
                handler.removeCallbacks(mPendingCheckForLongPress);
            }
            if (mVelocityTracker != null) {
                mVelocityTracker.recycle();
                mVelocityTracker = null;
            }
            mActivePointerId = INVALID_POINTER;
            break;
        }
        case MotionEvent.ACTION_POINTER_UP: {
            onSecondaryPointerUp(ev);
            final int x = mMotionX;
            final int y = mMotionY;
            final int motionPosition = pointToPosition(x, y);
            if (motionPosition >= 0) {
                // Remember where the motion event started
                v = getChildAt(motionPosition - mFirstPosition);
                mMotionViewOriginalTop = v.getTop();
                mMotionPosition = motionPosition;
            }
            mLastY = y;
            break;
        }
        }
        return true;
    }
这个方法中的代码就非常多了,因为它所处理的逻辑也非常多,要监听各种各样的触屏事件。但是我们目前所关心的就只有手指在屏幕上滑动这一个事件而已,对应的是ACTION_MOVE这个动作,那么我们就只看这部分代码就可以了。
可以看到,ACTION_MOVE这个case里面又嵌套了一个switch语句,是根据当前的TouchMode来选择的。那这里我可以直接告诉大家,当手指在屏幕上滑动时,TouchMode是等于TOUCH_MODE_SCROLL这个值的,至于为什么那又要牵扯到另外的好几个方法,这里限于篇幅原因就不再展开讲解了,喜欢寻根究底的朋友们可以自己去源码里找一找原因。
这样的话,代码就应该会走到第78行的这个case里面去了,在这个case当中并没有什么太多需要注意的东西,唯一一点非常重要的就是第92行调用的trackMotionScroll()方法,相当于我们手指只要在屏幕上稍微有一点点移动,这个方法就会被调用,而如果是正常在屏幕上滑动的话,那么这个方法就会被调用很多次。那么我们进入到这个方法中瞧一瞧,代码如下所示:
    boolean trackMotionScroll(int deltaY, int incrementalDeltaY) {
        final int childCount = getChildCount();
        if (childCount == 0) {
            return true;
        }
        final int firstTop = getChildAt(0).getTop();
        final int lastBottom = getChildAt(childCount - 1).getBottom();
        final Rect listPadding = mListPadding;
        final int spaceAbove = listPadding.top - firstTop;
        final int end = getHeight() - listPadding.bottom;
        final int spaceBelow = lastBottom - end;
        final int height = getHeight() - getPaddingBottom() - getPaddingTop();
        if (deltaY < 0) {
            deltaY = Math.max(-(height - 1), deltaY);
        } else {
            deltaY = Math.min(height - 1, deltaY);
        }
        if (incrementalDeltaY < 0) {
            incrementalDeltaY = Math.max(-(height - 1), incrementalDeltaY);
        } else {
            incrementalDeltaY = Math.min(height - 1, incrementalDeltaY);
        }
        final int firstPosition = mFirstPosition;
        if (firstPosition == 0 && firstTop >= listPadding.top && deltaY >= 0) {
            // Don't need to move views down if the top of the first position
            // is already visible
            return true;
        }
        if (firstPosition + childCount == mItemCount && lastBottom <= end && deltaY <= 0) {
            // Don't need to move views up if the bottom of the last position
            // is already visible
            return true;
        }
        final boolean down = incrementalDeltaY < 0;
        final boolean inTouchMode = isInTouchMode();
        if (inTouchMode) {
            hideSelector();
        }
        final int headerViewsCount = getHeaderViewsCount();
        final int footerViewsStart = mItemCount - getFooterViewsCount();
        int start = 0;
        int count = 0;
        if (down) {
            final int top = listPadding.top - incrementalDeltaY;
            for (int i = 0; i < childCount; i++) {
                final View child = getChildAt(i);
                if (child.getBottom() >= top) {
                    break;
                } else {
                    count++;
                    int position = firstPosition + i;
                    if (position >= headerViewsCount && position < footerViewsStart) {
                        mRecycler.addScrapView(child);
                    }
                }
            }
        } else {
            final int bottom = getHeight() - listPadding.bottom - incrementalDeltaY;
            for (int i = childCount - 1; i >= 0; i--) {
                final View child = getChildAt(i);
                if (child.getTop() = headerViewsCount && position < footerViewsStart) {
                        mRecycler.addScrapView(child);
                    }
                }
            }
        }
        mMotionViewNewTop = mMotionViewOriginalTop + deltaY;
        mBlockLayoutRequests = true;
        if (count > 0) {
            detachViewsFromParent(start, count);
        }
        offsetChildrenTopAndBottom(incrementalDeltaY);
        if (down) {
            mFirstPosition += count;
        }
        invalidate();
        final int absIncrementalDeltaY = Math.abs(incrementalDeltaY);
        if (spaceAbove < absIncrementalDeltaY || spaceBelow < absIncrementalDeltaY) {
            fillGap(down);
        }
        if (!inTouchMode && mSelectedPosition != INVALID_POSITION) {
            final int childIndex = mSelectedPosition - mFirstPosition;
            if (childIndex >= 0 && childIndex < getChildCount()) {
                positionSelector(getChildAt(childIndex));
            }
        }
        mBlockLayoutRequests = false;
        invokeOnItemScrollListener();
        awakenScrollBars();
        return false;
    }
这个方法接收两个参数,deltaY表示从手指按下时的位置到当前手指位置的距离,incrementalDeltaY则表示据上次触发event事件手指在Y方向上位置的改变量,那么其实我们就可以通过incrementalDeltaY的正负值情况来判断用户是向上还是向下滑动的了。如第34行代码所示,如果incrementalDeltaY小于0,说明是向下滑动,否则就是向上滑动。
下面将会进行一个边界值检测的过程,可以看到,从第43行开始,当ListView向下滑动的时候,就会进入一个for循环当中,从上往下依次获取子View,第47行当中,如果该子View的bottom值已经小于top值了,就说明这个子View已经移出屏幕了,所以会调用RecycleBin的addScrapView()方法将这个View加入到废弃缓存当中,并将count计数器加1,计数器用于记录有多少个子View被移出了屏幕。那么如果是ListView向上滑动的话,其实过程是基本相同的,只不过变成了从下往上依次获取子View,然后判断该子View的top值是不是大于bottom值了,如果大于的话说明子View已经移出了屏幕,同样把它加入到废弃缓存中,并将计数器加1。
接下来在第76行,会根据当前计数器的值来进行一个detach操作,它的作用就是把所有移出屏幕的子View全部detach掉,在ListView的概念当中,所有看不到的View就没有必要为它进行保存,因为屏幕外还有成百上千条数据等着显示呢,一个好的回收策略才能保证ListView的高性能和高效率。紧接着在第78行调用了offsetChildrenTopAndBottom()方法,并将incrementalDeltaY作为参数传入,这个方法的作用是让ListView中所有的子View都按照传入的参数值进行相应的偏移,这样就实现了随着手指的拖动,ListView的内容也会随着滚动的效果。
然后在第84行会进行判断,如果ListView中最后一个View的底部已经移入了屏幕,或者ListView中第一个View的顶部移入了屏幕,就会调用fillGap()方法,那么因此我们就可以猜出fillGap()方法是用来加载屏幕外数据的,进入到这个方法中瞧一瞧,如下所示:
    /**
     * Fills the gap left open by a touch-scroll. During a touch scroll,
     * children that remain on screen are shifted and the other ones are
     * discarded. The role of this method is to fill the gap thus created by
     * performing a partial layout in the empty space.
     *
     * @param down
     *            true if the scroll is going down, false if it is going up
     */
    abstract void fillGap(boolean down);
OK,AbsListView中的fillGap()是一个抽象方法,那么我们立刻就能够想到,它的具体实现肯定是在ListView中完成的了。回到ListView当中,fillGap()方法的代码如下所示:
    void fillGap(boolean down) {
        final int count = getChildCount();
        if (down) {
            final int startOffset = count > 0 ? getChildAt(count - 1).getBottom() + mDividerHeight :
                    getListPaddingTop();
            fillDown(mFirstPosition + count, startOffset);
            correctTooHigh(getChildCount());
        } else {
            final int startOffset = count > 0 ? getChildAt(0).getTop() - mDividerHeight :
                    getHeight() - getListPaddingBottom();
            fillUp(mFirstPosition - 1, startOffset);
            correctTooLow(getChildCount());
        }
    }
down参数用于表示ListView是向下滑动还是向上滑动的,可以看到,如果是向下滑动的话就会调用fillDown()方法,而如果是向上滑动的话就会调用fillUp()方法。那么这两个方法我们都已经非常熟悉了,内部都是通过一个循环来去对ListView进行填充,所以这两个方法我们就不看了,但是填充ListView会通过调用makeAndAddView()方法来完成,又是makeAndAddView()方法,但这次的逻辑再次不同了,所以我们还是回到这个方法瞧一瞧:
    /**
     * Obtain the view and add it to our list of children. The view can be made
     * fresh, converted from an unused view, or used as is if it was in the
     * recycle bin.
     *
     * @param position Logical position in the list
     * @param y Top or bottom edge of the view to add
     * @param flow If flow is true, align top edge to y. If false, align bottom
     *        edge to y.
     * @param childrenLeft Left edge where children should be positioned
     * @param selected Is this position selected?
     * @return View that was added
     */
    private View makeAndAddView(int position, int y, boolean flow, int childrenLeft,
            boolean selected) {
        View child;
        if (!mDataChanged) {
            // Try to use an exsiting view for this position
            child = mRecycler.getActiveView(position);
            if (child != null) {
                // Found it -- we're using an existing child
                // This just needs to be positioned
                setupChild(child, position, y, flow, childrenLeft, selected, true);
                return child;
            }
        }
        // Make a new view for this position, or convert an unused view if possible
        child = obtainView(position, mIsScrap);
        // This needs to be positioned and measured
        setupChild(child, position, y, flow, childrenLeft, selected, mIsScrap[0]);
        return child;
    }
不管怎么说,这里首先仍然是会尝试调用RecycleBin的getActiveView()方法来获取子布局,只不过肯定是获取不到的了,因为在第二次Layout过程中我们已经从mActiveViews中获取过了数据,而根据RecycleBin的机制,mActiveViews是不能够重复利用的,因此这里返回的值肯定是null。
既然getActiveView()方法返回的值是null,那么就还是会走到第28行的obtainView()方法当中,代码如下所示:
   /**
     * Get a view and have it show the data associated with the specified
     * position. This is called when we have already discovered that the view is
     * not available for reuse in the recycle bin. The only choices left are
     * converting an old view or making a new one.
     *
     * @param position
     *            The position to display
     * @param isScrap
     *            Array of at least 1 boolean, the first entry will become true
     *            if the returned view was taken from the scrap heap, false if
     *            otherwise.
     *
     * @return A view displaying the data associated with the specified position
     */
    View obtainView(int position, boolean[] isScrap) {
        isScrap[0] = false;
        View scrapView;
        scrapView = mRecycler.getScrapView(position);
        View child;
        if (scrapView != null) {
            child = mAdapter.getView(position, scrapView, this);
            if (child != scrapView) {
                mRecycler.addScrapView(scrapView);
                if (mCacheColorHint != 0) {
                    child.setDrawingCacheBackgroundColor(mCacheColorHint);
                }
            } else {
                isScrap[0] = true;
                dispatchFinishTemporaryDetach(child);
            }
        } else {
            child = mAdapter.getView(position, null, this);
            if (mCacheColorHint != 0) {
                child.setDrawingCacheBackgroundColor(mCacheColorHint);
            }
        }
        return child;
    }
这里在第19行会调用RecyleBin的getScrapView()方法来尝试从废弃缓存中获取一个View,那么废弃缓存有没有View呢?当然有,因为刚才在trackMotionScroll()方法中我们就已经看到了,一旦有任何子View被移出了屏幕,就会将它加入到废弃缓存中,而从obtainView()方法中的逻辑来看,一旦有新的数据需要显示到屏幕上,就会尝试从废弃缓存中获取View。所以它们之间就形成了一个生产者和消费者的模式,那么ListView神奇的地方也就在这里体现出来了,不管你有任意多条数据需要显示,ListView中的子View其实来来回回就那么几个,移出屏幕的子View会很快被移入屏幕的数据重新利用起来,因而不管我们加载多少数据都不会出现OOM的情况,甚至内存都不会有所增加。
那么另外还有一点是需要大家留意的,这里获取到了一个scrapView,然后我们在第22行将它作为第二个参数传入到了Adapter的getView()方法当中。那么第二个参数是什么意思呢?我们再次看一下一个简单的getView()方法示例:
  @Override
    public View getView(int position, View convertView, ViewGroup parent) {
        Fruit fruit = getItem(position);
        View view;
        if (convertView == null) {
            view = LayoutInflater.from(getContext()).inflate(resourceId, null);
        } else {
            view = convertView;
        }
        ImageView fruitImage = (ImageView) view.findViewById(R.id.fruit_image);
        TextView fruitName = (TextView) view.findViewById(R.id.fruit_name);
        fruitImage.setImageResource(fruit.getImageId());
        fruitName.setText(fruit.getName());
        return view;
    }
第二个参数就是我们最熟悉的convertView呀,难怪平时我们在写getView()方法是要判断一下convertView是不是等于null,如果等于null才调用inflate()方法来加载布局,不等于null就可以直接利用convertView,因为convertView就是我们之间利用过的View,只不过被移出屏幕后进入到了废弃缓存中,现在又重新拿出来使用而已。然后我们只需要把convertView中的数据更新成当前位置上应该显示的数据,那么看起来就好像是全新加载出来的一个布局一样,这背后的道理你是不是已经完全搞明白了?
之后的代码又都是我们熟悉的流程了,从缓存中拿到子View之后再调用setupChild()方法将它重新attach到ListView当中,因为缓存中的View也是之前从ListView中detach掉的,这部分代码就不再重复进行分析了。
为了方便大家理解,这里我再附上一张图解说明:

好了,我们已经把ListView的整个工作流程代码都分析了,文章内容比较长,真心期望能够帮助到大家。
Android开发实例 四则运算计算器
先看计算器效果图
【技术】
关于这个计算器的一些技术,其核心是把中缀表达式转化为后缀表达式,这个时候需要使用一个最基础的数据结构——栈。
具体的操作原理可以参考这个博客 http://www.nowamagic.net/librarys/veda/detail/2307
然而,对于这个问题,早在上学期就已经解决了,但是那时候纯粹是为了Accepted HDU 1237 http://acm.hdu.edu.cn/showproblem.php?pid=1237 并没有为了要做出一个真正意义上能用的计算器App。这次开发的时候,直接把当年写的很挫的代码拉了下来用。
Android开发似乎用的都是Java,不得不说这是一种很好的语言,集成了很多很多有用的功能,需要的时候只需调用一下就行,不像C/C++那样,都要自己纯手打。
计算器核心代码
#include<stdio.h>
#include<string.h>
// + 999991
// - 999992
// * 999993
// / 999994
int stack1[1000];
double stack2[1000];
int a[1000], b[1000];
int main()
{
    int i;
    char s[1000];
    while (gets(s))
    {
        if (strlen(s) == 1 && s[0] == '0')break;
        int y = strlen(s);
        s[y] = ' '; s[y + 1] = '\0';
        int top1 = -1, top2 = -1, q = 1, sum = 0;
        for (i = 0; i<strlen(s); i++)
        {
            if (s[i] == ' ' && (s[i - 1]<'0' || s[i - 1]>'9')) continue;
            else if (s[i] == ' ')a[q] = sum, sum = 0, q++;
            else if (s[i] == '+')a[q] = 999991, q++;
            else if (s[i] == '-')a[q] = 999992, q++;
            else if (s[i] == '*')a[q] = 999993, q++;
            else if (s[i] == '/')a[q] = 999994, q++;
            else if (s[i] >= '0'&&s[i] <= '9') sum = 10 * sum + (s[i] - '0');
        }
        //1到q-1;
        //    for(i=1;i<q;i++) printf("%d\n",a[i]);
        int qq = -1;
        for (i = 1; i<q; i++)
        {
            if (a[i]<999991) qq++, b[qq] = a[i];
            else if (a[i] >= 999991)
            {
                if (top1 == -1)//栈为空
                {
                    top1++;
                    stack1[top1] = a[i];
                }
                else
                {
                    if (a[i] == 999991 || a[i] == 999992)
                    {
                        while (1)
                        {
                            qq++;
                            b[qq] = stack1[top1];
                            top1--;
                            if (top1 == -1) break;
                        }
                        top1++;
                        stack1[top1] = a[i];
                    }
                    else if (a[i] == 999993 || a[i] == 999994)
                    {
                        while (1)
                        {
                            if (stack1[top1] == 999991 || stack1[top1] == 999992 || top1 == -1) break;
                            qq++;
                            b[qq] = stack1[top1];
                            top1--;
                        }
                        top1++;
                        stack1[top1] = a[i];
                    }
                }
            }
        }
        for (i = top1; i >= 0; i--) qq++, b[qq] = stack1[i];
        for (i = 0; i <= qq; i++)
        {
            if (top2 == -1)
            {
                top2++;
                stack2[top2] = b[i];
            }
            else if (b[i]<999991) top2++, stack2[top2] = b[i];
            else if (b[i] == 999991)top2--, stack2[top2] = stack2[top2] + stack2[top2 + 1];
            else if (b[i] == 999992)top2--, stack2[top2] = stack2[top2] - stack2[top2 + 1];
            else if (b[i] == 999993)top2--, stack2[top2] = stack2[top2] * stack2[top2 + 1];
            else if (b[i] == 999994)top2--, stack2[top2] = 1.0*stack2[top2] / stack2[top2 + 1];
        }
        printf("%.2lf\n", stack2[0]);
    }
    return 0;
}
Android应用开发 标准体重计算器
应用的操作和原理
目标Android应用的操作过程是这样的:选择你的性别,然后输入你的身高,点查看计算结果的按钮就在Toast中显示你的标准体重。力求操作简单,结果显示清楚。
标准体重的计算公式:
男性:(身高cm-80)×70?=标准体重
女性:(身高cm-70)×60?=标准体重
应用的源码
BMIActivity.java:
package com.lingdududu.bmi;

import java.text.DecimalFormat;
import java.text.NumberFormat;
import android.app.Activity;
import android.os.Bundle;
import android.view.View;
import android.view.View.OnClickListener;
import android.widget.Button;
import android.widget.EditText;
import android.widget.RadioButton;
import android.widget.Toast;
/*
* @author lingdududu * 该程序的功能是用户选择自己的性别和输入自己的身高,然后点击按钮,就能在Toast显示出自己的标准体重
*/
public class BMIActivity extends Activity {
/** Called when the activity is first created. */
    private Button countButton;
    private EditText heighText;
    private RadioButton maleBtn, femaleBtn;
    String sex = "";
    double height;
    @Override
    public void onCreate(Bundle savedInstanceState) {
        super.onCreate(savedInstanceState);
        setContentView(R.layout.main);
        //调用创建视图的函数
        creadView();
        //调用性别选择的函数
        sexChoose();
        //调用Button注册监听器的函数
        setListener();
   }

    //响应Button事件的函数
    private void setListener() {
        countButton.setOnClickListener(countListner);
    }

    private OnClickListener countListner = new OnClickListener() {

        @Override
        public void onClick(View v) {
            // TODO Auto-generated method stub
            Toast.makeText(BMIActivity.this, "你是一位"+sexChoose()+"\n"
                           +"你的身高为"+Double.parseDouble(heighText.getText().toString())+"cm"
                           +"\n你的标准体重为"+getWeight(sexChoose(), height)+"kg", Toast.LENGTH_LONG)
                           .show();
        }
    };

    //性别选择的函数
    private String sexChoose(){
        if (maleBtn.isChecked()) {
            sex = "男性";
        }
        else if(femaleBtn.isChecked()){
            sex = "女性";
        }
        return sex;
    }

    //创建视图的函数
    public void creadView(){
        //txt=(TextView)findViewById(R.id.txt);
        countButton=(Button)findViewById(R.id.btn);
        heighText=(EditText)findViewById(R.id.etx);
        maleBtn=(RadioButton)findViewById(R.id.male);
        femaleBtn=(RadioButton)findViewById(R.id.female);
        //txt.setBackgroundResource(R.drawable.bg);
    }

    //标准体重格式化输出的函数
    private String format(double num) {
        NumberFormat formatter = new DecimalFormat("0.00");
        String str = formatter.format(num);
        return str;
        }

    //得到标准体重的函数
    private String getWeight(String sex, double height) {
        height = Double.parseDouble(heighText.getText().toString());
        String weight = "";
        if (sex.equals("男性")) {
              weight =format((height - 80) * 0.7);
        }
        else {
              weight = format((height - 70) * 0.6);
        }
        return weight;
       }
   }
main.xml:
XML/HTML代码
    <?xml version="1.0" encoding="utf-8"?>
    <LinearLayout xmlns:android="http://schemas.android.com/apk/res/android"
        android:orientation="vertical"
        android:layout_width="fill_parent"
        android:layout_height="fill_parent"
        android:background="@drawable/pic"
        >
        <TextView
            android:id="@+id/txt"
            android:layout_width="fill_parent"
            android:layout_height="wrap_content"
            android:gravity="center"
            android:text="@string/hello"
            android:textSize="16px"
            />
       <TextView
            android:layout_width="fill_parent"
            android:layout_height="wrap_content"
            android:text="@string/sex"
            />
       <RadioGroup
          android:layout_width="fill_parent"
          android:layout_height="wrap_content"
          android:orientation="horizontal"
          >
          <RadioButton
               android:id="@+id/male"
               android:layout_width="wrap_content"
               android:layout_height="wrap_content"
               android:text="男"
               />
          <RadioButton
               android:id="@+id/female"
               android:layout_width="wrap_content"
               android:layout_height="wrap_content"
               android:text="女"
               />
       </RadioGroup>
       <TextView
            android:layout_width="fill_parent"
            android:layout_height="26px"
            android:text="@string/heigh"
            />
       <EditText
            android:id="@+id/etx"
            android:layout_width="fill_parent"
            android:layout_height="wrap_content"
            />
       <Button
             android:id="@+id/btn"
             android:layout_width="fill_parent"
             android:layout_height="wrap_content"
             android:text="@string/count"
             />
    </LinearLayout>
应用效果图

先看下图所示,那个百分号的浮动小球。
如图片左上角所示,球中还会显示当前手机的运行状况,向下拉动还会有弹射来达到加速、清理等目的。
那好,先来实现一个类似的小球(仅限于形状,功能你懂得)。
查阅了相关资料,整个界面除了小球以外,其他部分均是做透明处理。
1、由于用到了CompatModeWrapper,所以需要在AndroidManifest.xml中添加以下权限:
<uses-permission android:name="android.permission.SYSTEM_ALERT_WINDOW" />
要想在应用中被启动为一个Activity或Service,需要注册,这里是Service:
<service android:name=".Service1" />
2、界面透明化处理,整体代码如下:
package com.XXX.autostart;
import android.view.View;
import android.app.Service;
import android.content.Intent;
import android.graphics.PixelFormat;
import android.os.Handler;
import android.os.IBinder;
import android.view.Gravity;
import android.view.LayoutInflater;
import android.view.MotionEvent;
import android.view.WindowManager;
import android.view.View.OnClickListener;
import android.view.View.OnTouchListener;
import android.view.WindowManager.LayoutParams;
import android.widget.ImageButton;
import android.widget.LinearLayout;
public class Service1 extends Service
{
LinearLayout mFloatLayout;
WindowManager.LayoutParams wmParams;
WindowManager mWindowManager;
ImageButton mFloatView;
@Override
public void onCreate()
{
// TODO Auto-generated method stub
super.onCreate();
createFloatView();
}
@Override
public IBinder onBind(Intent intent)
{
// TODO Auto-generated method stub
return null;
}
private void createFloatView()
{
wmParams = new WindowManager.LayoutParams();
mWindowManager = (WindowManager)getApplication().getSystemService(getApplication().WINDOW_SERVICE);
wmParams.type = LayoutParams.TYPE_PHONE;
wmParams.format = PixelFormat.RGBA_8888;
wmParams.flags = LayoutParams.FLAG_NOT_FOCUSABLE;
wmParams.gravity = Gravity.LEFT | Gravity.TOP;
wmParams.x = 0;
wmParams.y = 0;
wmParams.width = WindowManager.LayoutParams.WRAP_CONTENT;
wmParams.height = WindowManager.LayoutParams.WRAP_CONTENT;
LayoutInflater inflater = LayoutInflater.from(getApplication());
mFloatLayout = (LinearLayout) inflater.inflate(R.layout.float_layout, null);
mWindowManager.addView(mFloatLayout, wmParams);
mFloatView = (ImageButton)mFloatLayout.findViewById(R.id.float_id);
mFloatLayout.measure(View.MeasureSpec.makeMeasureSpec(0,
View.MeasureSpec.UNSPECIFIED), View.MeasureSpec
.makeMeasureSpec(0, View.MeasureSpec.UNSPECIFIED));
mFloatView.setOnTouchListener(new OnTouchListener() {
@Override
public boolean onTouch(View v, MotionEvent event) {
// TODO Auto-generated method stub
wmParams.x = (int) event.getRawX() - mFloatView.getMeasuredWidth() / 2;
wmParams.y = (int) event.getRawY() - mFloatView.getMeasuredHeight() / 2 - 25;
mWindowManager.updateViewLayout(mFloatLayout, wmParams);
return false;
}
});
mFloatView.setOnClickListener(new OnClickListener() {
@Override
public void onClick(View v) {
// TODO Auto-generated method stub
mFloatView.setVisibility(View.INVISIBLE);
Handler handler = new Handler();
handler.postDelayed(new Runnable() {
public void run() {
mFloatView.setVisibility(View.VISIBLE);
}
}, 3000);
}
});
}
@Override
public void onDestroy()
{
// TODO Auto-generated method stub
super.onDestroy();
if(mFloatLayout != null)
{
mWindowManager.removeView(mFloatLayout);
}
}
}
这里是利用ImageButton组件来实现小球,关键在于其显示的图片是圆形。
因此,要想将浮动窗口实现为其他形状,只需制作相应的图片赋给组件。
对于小球的功能,只是实现了在手机屏幕上随意拖动,单击消失三秒后重现。
3、浮动小球有了,怎么让它启动呢?注意上面实现的类Service1,继承的是Service。
在ManiActivity.java中,让其显现的方式很简单,代码如下:
finish();
Intent intent = new Intent(getApplicationContext(), Service1.class);
startService(intent);
注意,这里对于MainActivity类不需要做任何处理,新建工程时默认就好。当然,要实现其他功能例外。
代码finish();可加可不加,加上之后使得程序一运行就只剩下小球,原来的界面让其消失。
效果图如下,图形找的是红色小火焰。
4、到此,浮动小球就实现了,那怎么让它开机自启动呢?
其实也很简单,用到了BroadcastReceiver。
还是先添加权限:
<uses-permission android:name="android.permission.RECEIVE_BOOT_COMPLETED" />
另外,对于系统的广播消息,要想在开机等时刻能够捕获到,还需添加以下内容:
<receiver android:name=".BootBroadcastReceiver">
<intent-filter>
<action android:name="android.intent.action.BOOT_COMPLETED" />
</intent-filter>
</receiver>
实现代码如下:
package com.XXX.autostart;
import android.content.BroadcastReceiver;
import android.content.Context;
import android.content.Intent;
public class BootBroadcastReceiver extends BroadcastReceiver {
static final String ACTION = "android.intent.action.BOOT_COMPLETED";
@Override
public void onReceive(Context context, Intent intent) {
if (intent.getAction().equals(ACTION)) {
Intent intent1 = new Intent(context, Service1.class);
intent1.addFlags(Intent.FLAG_ACTIVITY_NEW_TASK);
context.startService(intent1);
}
}
}
将手机ReBoot,可以发现红色小球会自行启动,不过速度比较慢(和360安全卫士相比)。
Android开机自启动程序实例
背景知识:当Android启动时,会发出一个系统广播,内容为ACTION_BOOT_COMPLETED,它的字
符串常量表示为 android.intent.action.BOOT_COMPLETED。只要在程序中“捕捉”到这个消息,再启动之
即可。记住,Android框架说:Don''t call me, I''ll call you back。我们要做的是做好接收这个消息的准备,而
实现的手段就是实现一个BroadcastReceiver。
1、界面Activity,BootStartDemo.java文件
public class BootStartDemo extends Activity {
/** Called when the activity is first created. */
@Override
public void onCreate(Bundle savedInstanceState) {
super.onCreate(savedInstanceState);
// 无title
requestWindowFeature(Window.FEATURE_NO_TITLE);
// 全屏
getWindow().setFlags(WindowManager.LayoutParams.FLAG_FULLSCREEN,
WindowManager.LayoutParams.FLAG_FULLSCREEN);
setContentView(R.layout.main);
new Thread() {
public void run() {
try {
/* 10秒后关闭页面*/
sleep(10000);
} catch (Exception e) {
e.printStackTrace();
} finally {
finish(); // 关闭页面
}
}
}.start();
}
}
这段代码很简单,当Activity 启动时,会显示TextView,用它显示你想显示的字样,并且这个页面只显示10秒后消失。
2、接收广播消息:BootBroadcastReceiver.java
public class BootBroadcastReceiver extends BroadcastReceiver {
static final String action_boot="android.intent.action.BOOT_COMPLETED";
@Override
public void onReceive(Context context, Intent intent) {
if (intent.getAction().equals(action_boot)){
Intent ootStartIntent=new Intent(context,BootStartDemo.class);
ootStartIntent.addFlags(Intent.FLAG_ACTIVITY_NEW_TASK);
context.startActivity(ootStartIntent);
}
}
}
该类继续自 BroadcastReceiver,覆载方法 onReceive 中,检测接收到的 Intent 是否符合
BOOT_COMPLETED,如果符合,则启动BootStartDemo这个Activity。
3、配置文件
(1)AndroidManifest.xml :
<?xml version="1.0" encoding="utf-8"?>
<!-- 这是一个开机自启动程序 -->
<manifest xmlns:android="http://schemas.android.com/apk/res/android"
package="com.ajie.bootstartdemo"
android:versionCode="1"
android:versionName="1.0">
<application android:icon="@drawable/icon" android:label="@string/app_name">
<activity android:name=".BootStartDemo"
android:label="@string/app_name">
<intent-filter>
<action android:name="android.intent.action.MAIN" />
<category android:name="android.intent.category.LAUNCHER" />
</intent-filter>
</activity>
<span style="color: #ff00ff;"><receiver android:name=".BootBroadcastReceiver">
<intent-filter>
<action android:name="android.intent.action.BOOT_COMPLETED" />
<category android:name="android.intent.category.HOME" />
</intent-filter>
</receiver>
</span> </application>
<span style="color: #ff00ff;"><strong><uses-permission android:name="android.permission.RECEIVE_BOOT_COMPLETED"></uses-permission></strong>
</span></manifest>
注意其中颜色标红那一部分,该节点向系统注册了一个 receiver,子节点 intent-filter 表示接收
android.intent.action.BOOT_COMPLETED 消息。并且还要配置android.permission.RECEIVE_BOOT_COMPLETED权限。
(2)Layout文件,main.xml
<?xml version="1.0" encoding="utf-8"?>
<LinearLayout xmlns:android="http://schemas.android.com/apk/res/android"
android:orientation="vertical"
android:layout_width="fill_parent"
android:layout_height="fill_parent"
>
<TextView
android:layout_width="fill_parent"
android:layout_height="fill_parent"
android:text="@string/boottext"
android:textColor="#5F2DD2"
android:background="#FFFFFF"
android:textSize="60px"
android:gravity="center_horizontal"
/>
</LinearLayout>
完成后,编译出apk包,安装到模拟器或手机中。关机,重新开机,就会显示BootStartDemo这个Activity显示出来的页面。
相关文章
- 有时为了网站安全和版权问题,会对自己写的php源码进行加密,在php加密技术上最常用的是zend公司的zend guard 加密软件,现在我们来图文讲解一下。 下面就简单说说如何...2016-11-25
- 下面我们来看一篇关于Android子控件超出父控件的范围显示出来方法,希望这篇文章能够帮助到各位朋友,有碰到此问题的朋友可以进来看看哦。 <RelativeLayout xmlns:an...2016-10-02
- ps软件是现在很多人都会使用到的,HSL面板在ps软件中又有着非常独特的作用。这次文章就给大家介绍下ps怎么使用HSL面板,还不知道使用方法的下面一起来看看。  ...2017-07-06
- 这篇文章主要介绍了Vue组件跨层级获取组件操作,具有很好的参考价值,希望对大家有所帮助。一起跟随小编过来看看吧...2020-07-28
- 许多的朋友对于Plesk控制面板应用不是非常的了解特别是英文版的Plesk控制面板,在这里小编整理了一些关于Plesk控制面板常用的使用方案整理,具体如下。 本文基于Linu...2016-10-10
使用insertAfter()方法在现有元素后添加一个新元素
复制代码 代码如下: //在现有元素后添加一个新元素 function insertAfter(newElement, targetElement){ var parent = targetElement.parentNode; if (parent.lastChild == targetElement){ parent.appendChild(newEl...2014-05-31Android开发中findViewById()函数用法与简化
findViewById方法在android开发中是获取页面控件的值了,有没有发现我们一个页面控件多了会反复研究写findViewById呢,下面我们一起来看它的简化方法。 Android中Fin...2016-09-20jQuery 1.9使用$.support替代$.browser的使用方法
jQuery 从 1.9 版开始,移除了 $.browser 和 $.browser.version , 取而代之的是 $.support 。 在更新的 2.0 版本中,将不再支持 IE 6/7/8。 以后,如果用户需要支持 IE 6/7/8,只能使用 jQuery 1.9。 如果要全面支持 IE,并混合...2014-05-31- 如果我们的项目需要做来电及短信的功能,那么我们就得在Android模拟器开发这些功能,本来就来告诉我们如何在Android模拟器上模拟来电及来短信的功能。 在Android模拟...2016-09-20
使用percona-toolkit操作MySQL的实用命令小结
1.pt-archiver 功能介绍: 将mysql数据库中表的记录归档到另外一个表或者文件 用法介绍: pt-archiver [OPTION...] --source DSN --where WHERE 这个工具只是归档旧的数据,不会对线上数据的OLTP查询造成太大影响,你可以将...2015-11-24- 大概有如下步骤 新建项目Bejs 新建文件package.json 新建文件Gruntfile.js 命令行执行grunt任务 一、新建项目Bejs源码放在src下,该目录有两个js文件,selector.js和ajax.js。编译后代码放在dest,这个grunt会...2014-06-07
如何使用php脚本给html中引用的js和css路径打上版本号
在搜索引擎中搜索关键字.htaccess 缓存,你可以搜索到很多关于设置网站文件缓存的教程,通过设置可以将css、js等不太经常更新的文件缓存在浏览器端,这样访客每次访问你的网站的时候,浏览器就可以从浏览器的缓存中获取css、...2015-11-24- 这篇文章主要介绍了Vue 组件复用多次自定义参数操作,具有很好的参考价值,希望对大家有所帮助。一起跟随小编过来看看吧...2020-07-27
- 一、下载 mysqlsla [root@localhost tmp]# wget http://hackmysql.com/scripts/mysqlsla-2.03.tar.gz--19:45:45-- http://hackmysql.com/scripts/mysqlsla-2.03.tar.gzResolving hackmysql.com... 64.13.232.157Conn...2015-11-24
- 今天我们来给大家介绍下在Vue开发中我们经常会碰到的一种需求场景,本文主要介绍了Vue动态查询规则生成组件,需要的朋友们下面随着小编来一起学习学习吧...2021-05-27
- C#注释的一些使用方法浅谈,需要的朋友可以参考一下...2020-06-25
- 夜神android模拟器如何设置代理呢?对于这个问题其实操作起来是非常的简单,下面小编来为各位详细介绍夜神android模拟器设置代理的方法,希望例子能够帮助到各位。 app...2016-09-20
- 为了增强android应用的用户体验,我们可以在一些Button按钮上自定义动态的设置一些样式,比如交互时改变字体、颜色、背景图等。 今天来看一个通过重写Button来动态实...2016-09-20
- 这篇文章主要介绍了Vue 过渡(动画)transition组件案例详解,非常不错,具有参考借鉴价值,需要的朋友参考下...2017-01-26
- 这篇文章主要介绍了js组件SlotMachine实现图片切换效果制作抽奖系统的相关资料,需要的朋友可以参考下...2016-04-19